How to Change Date Format in Excel (The Easy Way)
Dates and times are two of the most common data types that users work with when using Microsoft Excel. 📅
However, it may be confusing for users to work with dates as Excel has default date formats and has a variety of ways of displaying it.
That’s why knowing Excel date formats and how to change them is super helpful.
In this tutorial, we’ll cover exactly how you can change the date format in Excel along with some tips and issues (and its fix) that you might need to know along the way. 🧐
To start, download this sample Excel workbook we’ve created for you for this tutorial.
Change the Date Format using the Ribbon
The fastest way to change the date format in Excel is by using the Number Format in the Ribbon. Here, you change the date format to Short Date or Long Date.
To do that,
Step 1) Select the cell which contains the date that you want to format.
Step 2) Go to the Home Tab.
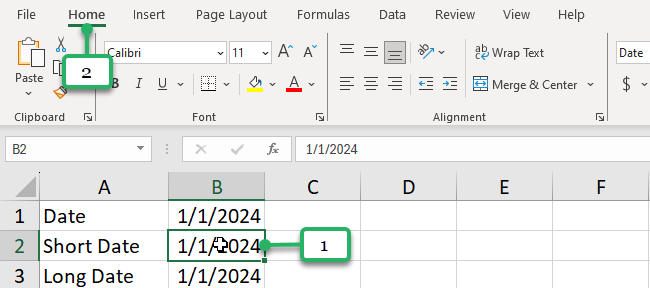
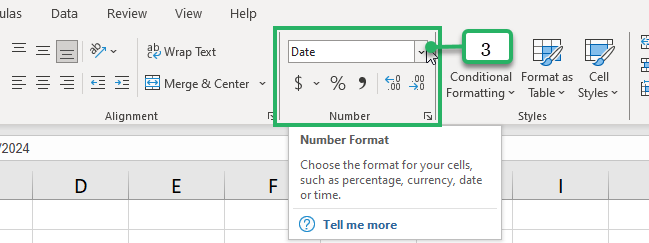
Step 3) In the Number group, click the downward arrow of the number format box.
Step 4) Select the Short Date format or the Long Date format from the drop-down. For this example, let’s select the Short Date option.
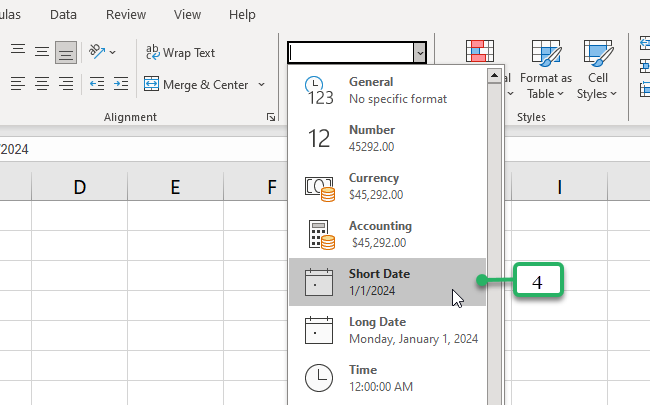
This shows you the usual way of writing or displaying dates which is month, day, then year (m/d/yyyy).
If you click the Long Date format, this is how Excel displays it: day of the week, month, day, and year.
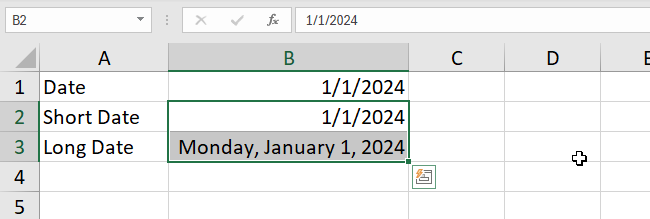
The Short Date and Long Date are Excel’s default format for dates. If you don’t want these date formats and prefer to format dates differently, you can do this too. 👇
Change Date format using Format Cells
To show other different date formats available,
Step 1) Select the cell which contains the date you want to format.

Step 2) Press Ctrl + 1. This will open the Format Cells dialog box.
Step 3) Make sure you click the Number Tab.
Step 4) Under the Category box, select Date.
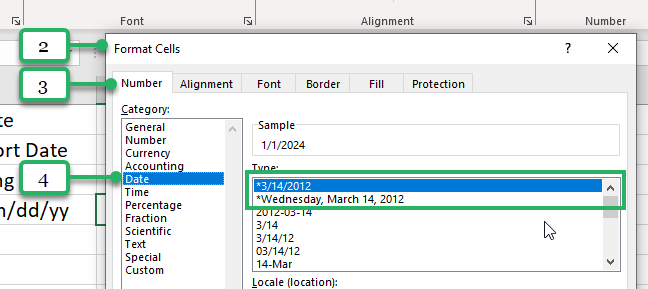
Step 5) Under the Type box, you’ll see the date format options available. You’ll see that the first 2 types have an asterisk (*) before them.
Date formats with an asterisk show the date formats for the Short date and Long date we used earlier.
The type box also responds to changes in regional date and time settings that are specified for the operating system.
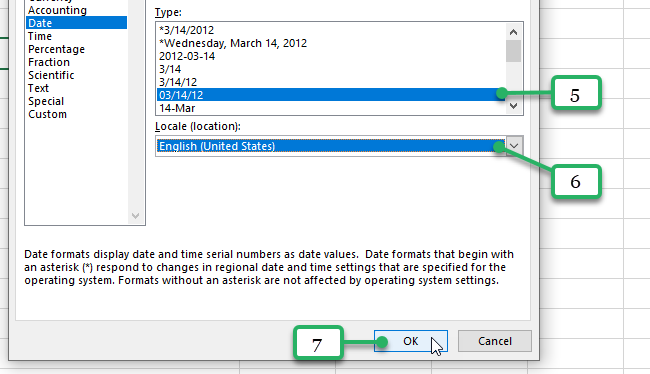
Select another type of date format in the options. Let’s click the 5th format which displays the date as mm/dd/yy.
Step 6) If you want to use a date format according to how another language displays dates, choose the language in Locale (location).
Let’s select English (United States).
Step 7) Click OK.
Excel now displays the date as mm/dd/yy. 😊

Convert Date to Other Locales
If you want to use a date format according to how another language displays dates, choose the language in Locale (location). 🌎
For example, dates are usually displayed in dd/mm/yyyy format in the United Kingdom.
You can follow the steps 1-4 above, then,
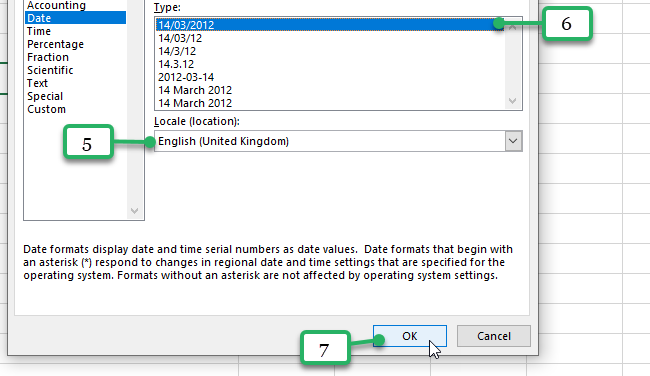
Step 5) Under the Locale, select English (United Kingdom) from the drop-down.
The types above automatically show the date formats in this location.
Step 6) Select the first one on the list which shows the dd/mm/yyyy format.
Step 7) Click OK.
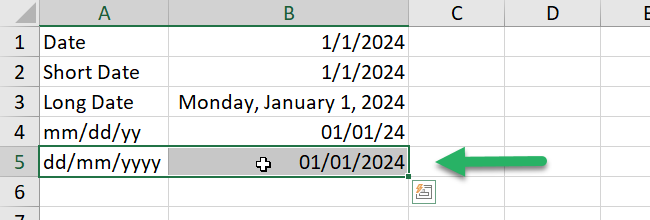
Excel now displays the date as dd/mm/yyyy format.
Change the Default Date format
You can also change the default date and/or time formats on your computer. For example, you want to change the US date format to the UK date format.
To do that, we’re going to go outside of our Excel worksheet and go to the Control Panel of your Microsoft Windows. 💻
Step 1) Go to Control Panel.
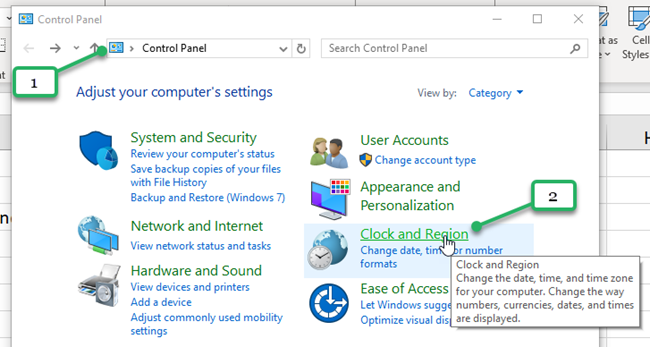
Step 2) Click Clock and Region.
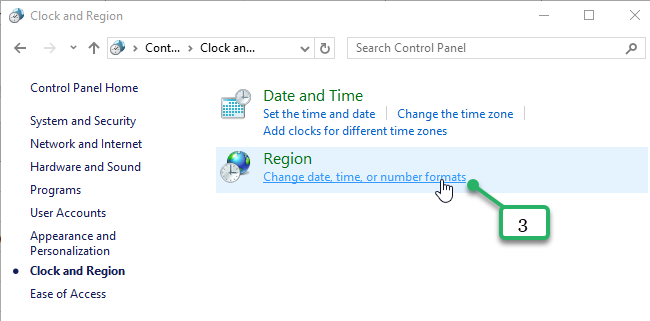
Step 3) Click Change the date, time, or number formats.
Step 4) On the Formats tab, choose the region under Format, and then set the date and time formatting by clicking on an arrow next to the format you want to change and selecting the desired one from the drop-down list.
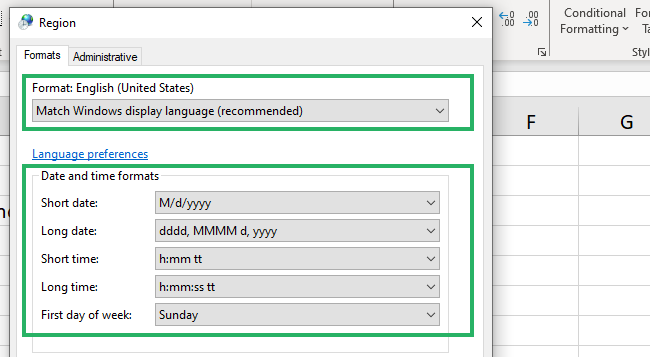
Step 5) Check the preview in the example box below.
Step 6) Finally, click OK.

How to create a custom date format
If none of the available Excel date formats is suitable for you, you can create your own.
Here’s how👇
Step 1) Select the cell which contains the date you want to format.
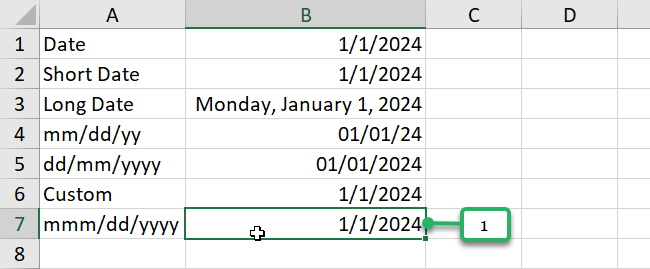
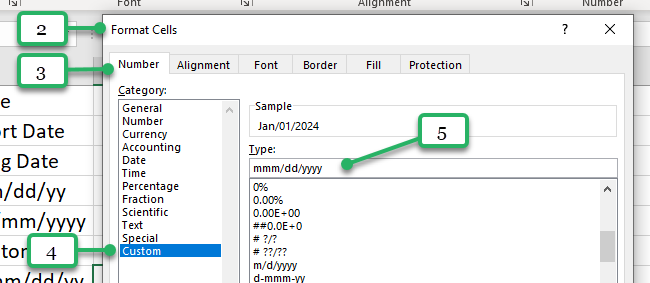
Step 2) Press Ctrl + 1 to open the Format Cells dialog box.
Step 3) In the Format Cells box, click the Number tab.
Step 4) In the Category list, select Custom.
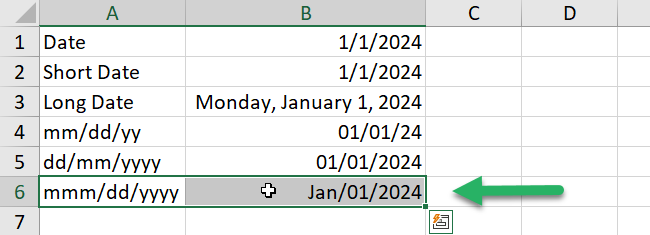
Step 5) In the Type box, type the number format code. For this example, let’s type mmm/dd/yyyy and you’ll see the sample preview above.
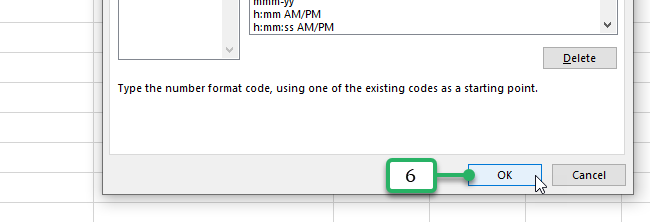
Step 6) Click OK.
Excel will display the date in your new custom date format.
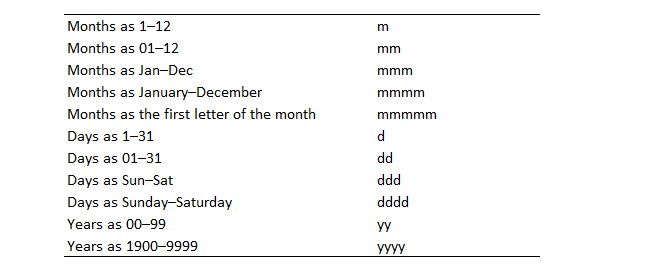
Here are helpful number format codes you can use to create a custom date format.
Common Issue When Changing Date Formats in Excel: Dates Shown as Hashtags (#####)
When you see your cell displays hashtags instead of your dates like this, what do you do? 😬

Not to worry, it’s most likely that your cells aren’t wide enough to show the whole number, and it’s totally fixable.
To fix this, hover your cursor on the right border of the column that contains the cells with hashtags (#####).
When the cursor changes to black with two arrows pointing left and right, double-click it. This will resize the column to fit the number. You can also drag the right border of the column to make it any size you want.

That’s It—Now What?
Great work! 👏
You’ve learned how to change the date format in Excel. But there is still so much to learn about date and time in Excel. We’ve got you covered with that too.
Learn more about Date and Time functions in Excel next with these articles:
