How to Insert Dates in Excel Automatically (Easily)
Learning how to automatically insert dates will definitely boost your Excel efficiency. 🚀
This allows you to save time and effort from manually inserting dates, and make sure that your data entries are accurate and consistent in your Excel spreadsheet. 😀
In this tutorial, you’ll learn how to insert dates in Excel automatically. Whether you need to autofill sequential dates or one same date for the rest of your cells, you can make Excel work for you.
Ready to start? Download this sample workbook we’ve created for this tutorial.
Autofill dates using the Auto Fill Feature
To automatically insert dates in a range of cells in your Excel sheet, let’s maximize Microsoft Excel’s Auto Fill feature.
The Auto Fill feature allows you to fill cells with data that follows a pattern or is based on data in other cells.
For this tutorial, the kind of data we’ll focus on is dates. 🔍
Depending on what kind of dates you need to autofill or auto-populate in your cells, we’ll guide you through it step-by-step.
Open your sample workbook and let’s start! 👇
Autofill sequential dates
One of the most common data to autofill is sequential dates. This means you automatically fill a column or row with an incrementing date series that increases by one day.
To do this,
Step 1) Enter your first date in a cell. By default, Excel records date in Short Date format (m/d/yyyy).

Step 2) Click on the cell with the first date to select it, and hover your mouse cursor on the fill handle which is the small green square that appears at the bottom-right corner of the cell.

Step 3) Once the cursor changes to a black plus sign, drag down the fill handle to fill the rest of the blank cells.
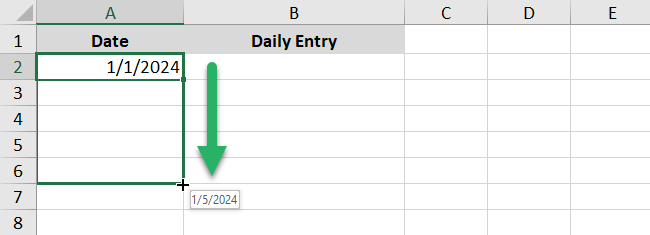
This is now the result.
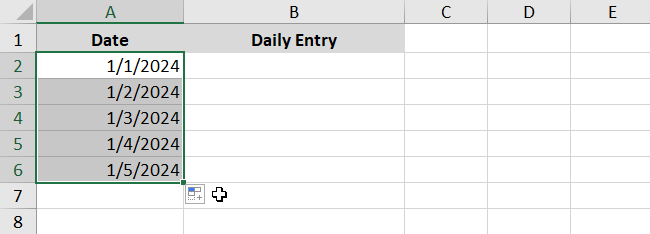
As you can see, Excel fills the rest of the cells with dates that increase by one day. 👀
To autofill sequential dates in your rows, instead of dragging the fill handle down, drag it to the right to fill the blank cells in the row.
Autofill the same date in cells
If you want to copy the same date on your cells instead of auto-filling cells with sequential dates, you can do this too.
Step 1) Enter the first date in a cell.

Step 2) Drag the fill handle down to fill the rest of the cells.
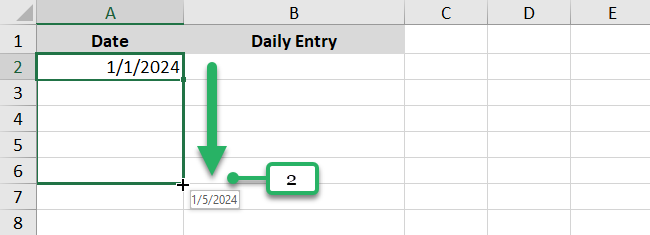
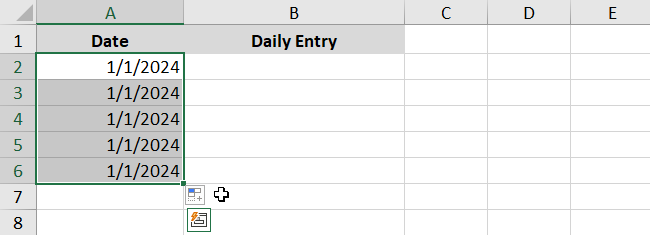
Step 3) Click the Auto Fill Options at the bottom right corner of the cells.
Step 4) Select “Copy Cells” from the Auto Fill drop-down list.
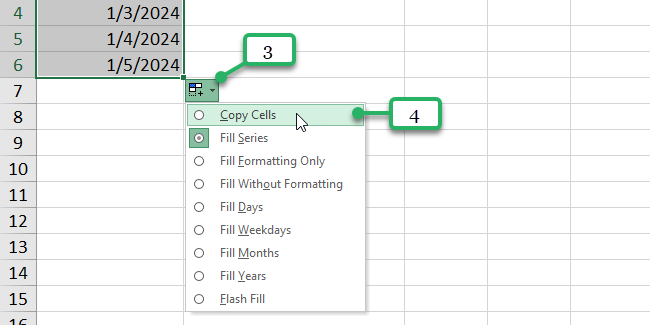
By selecting Copy Cells, the same date (first date) is copied in the rest of the cells.
Autofill weekdays, months or years
As you’ve seen previously, the AutoFill menu shows you many options for how to fill dates in your range of cells.
These are:
- Fill Days
- Fill Weekdays
- Fill Months
- Fill Years
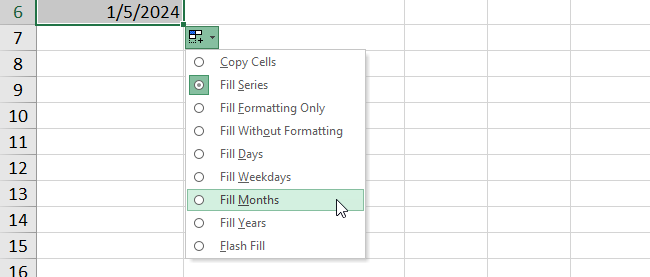
If you want to autofill months in your range of cells, you just need to follow the same steps above: Enter the date and drag the fill handle.
When you click the AutoFill options, select Fill Months.
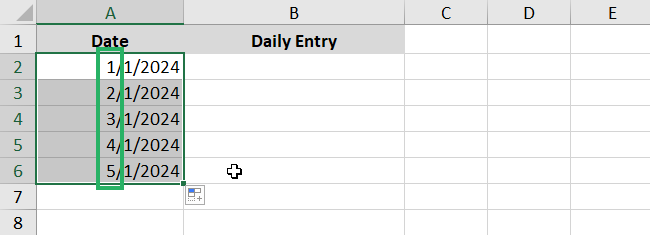
This is the result. Notice that the date is the first day of the month, every month.
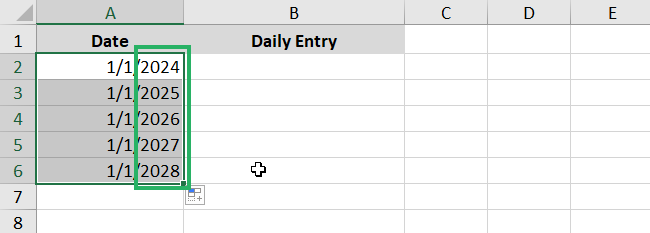
When you select the Fill Years option, this is the result.
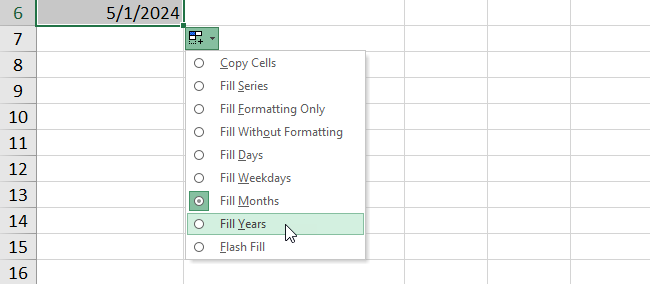
Excel shows you the same first date of the following years.
Auto insert every 2nd, 3rd or nth day
The AutoFill feature provides a quick and easy solution to insert dates in your cells. If you want more auto date features, like inserting every 2nd, 3rd, 4th, or nth day, month, or year in your Excel spreadsheet, you can do this too.
Let’s try this now.
Step 1) Add the first date in a cell.
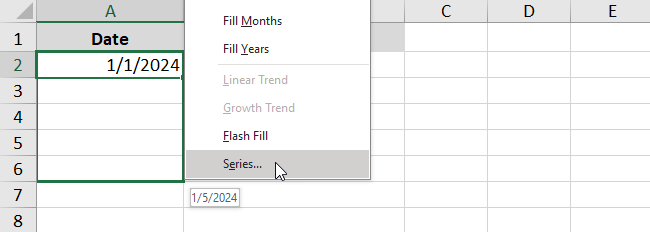
Step 2) Select that cell, right-click on the fill handle, drag it down or across several cells, and then release.
Step 3) In the context menu, click “Series”. This will open the Series Dialog Box.
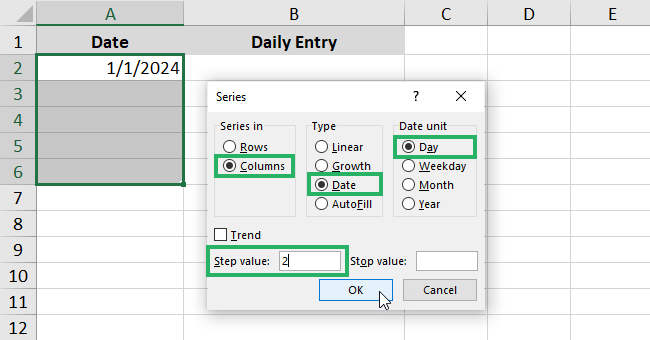
Step 4) For the Series In, select columns.
Step 5) For the type, select Date.
Step 6) For the Date unit, select Day.
Step 7) Enter the Step Value. Let’s type 2.
Step 8) Finally, Click OK.
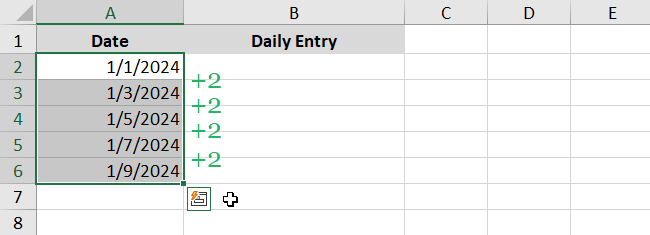
Your cells will be filled with dates with an incrementing date series that increases by 2 days.
That’s it—Now What?
Nice work!
You’ve just boosted your Excel efficiency after learning how to automatically insert dates in Excel today. 🚀
But let’s not stop here. Level up your Excel skills with these related Excel tutorials we’ve prepared for you:
