How to Move Cells in Excel: Easy Step-by-Step Guide
Moving cells is one of the most basic things users do in their Excel spreadsheets.
It allows users to easily edit and rearrange data to make their worksheets look more organized.
If you’re a beginner in Excel, you’re in the right place. In this article, we’ll show you different methods of how to move cells in Excel and guide you step by step in each method. 🧐
Download this sample workbook and let’s get moving! 💪
Move cells in Excel by Drag and Dropping
The fastest way to move cells in Excel is by drag and drop. With the use of your mouse, you can drag cells and move them anywhere in your worksheet.
Open your sample workbook and let’s try to move rows down.
To do that,
Step 1) Select the cells you want to move. In our example, it’s the TOTAL row of cells.

Step 2) Hover your mouse cursor on the border of the selection.

Step 3) When the pointer becomes a move pointer, drag the range of cells to a new location.

Nice move! 😊

In our example, we just moved one row of cells down.
However, don’t let this limit you.
You can definitely move multiple rows and move columns in Excel as well. Just select the rows/columns you want to move and drag them to your desired location in the worksheet.
Move cells in Excel by using Cut and Paste
Another way to move cells in Excel is by using Cut and Paste. You can access these commands through the Excel ribbon, or through the right-click menu options.
Of course, you can also use the keyboard shortcuts for Cut and Paste.
To put this into action, let’s try to move columns in our sample workbook. 👇
Use Excel Ribbon
Step 1) Select the cells you want to move. In our example, it’s the Salesperson column.

Step 2) Go to the Home Tab.
Step 3) In the Clipboard group, click the Cut button. ✂

This will highlight the selection with broken lines.

Step 4) Select a cell where you want to move the data.

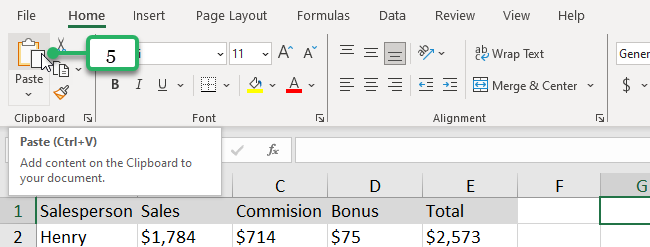
Step 5) Click the Paste button in the Clipboard group of the Home Tab.

Nice move! This is how it should look like. 😊

Use Right-Click
Step 1) Select the cells you want to move.

Step 2) Right-click and select Cut.

Step 3) Right-click on the cell where you want to move the data and select Insert Cut cells.

Use Keyboard Shortcuts
Step 1) Select the cells you want to move.
Step 2) Press Ctrl + X to Cut.
Step 3) Select the cell where you want to move the data.
Step 4) Press Ctrl + V to Paste to a new location.
It’s important to note that when you move cells to a new location, this new location shouldn’t have any existing data in it. Otherwise, new data could replace and delete the existing data in these cells.
To ensure you don’t accidentally delete existing data, move cells to the blank cells of your Excel spreadsheet. 👍
That’s It—Now What?
Nice moves out there! 😉
You’ve now learned different ways how to move cells in Excel. But it doesn’t stop here.
We’re just getting started with Excel, and you can continue to learn by reading these related Excel tutorials below:
