How to Add & Remove a Watermark in Excel Spreadsheet
Have you ever created a beautiful Excel template but were afraid someone will alter it? Without even getting your permission?
Or have you ever wondered how some of the Excel reports got confidential watermarks on them 🤔
To the point that it got you thinking, how did they do that?
Then wonder no more!
In this tutorial, I will teach you how to add watermarks to your precious templates and reports! 🤩
This is a fun exercise and you can follow through using this workbook.
Table of Contents
How to insert a watermark in Excel
First things first – what is a watermark?
A watermark is a mark or a symbol embedded in an object to identify its ownership and authenticity 🤯
Typically, you can see this on hard copies of documents. Especially legal documents where validity and authenticity are always required.
But did you know that you can apply it as well to digital content? Not only Microsoft word documents but also Microsoft Excel documents and workbooks.
And it is a very easy thing to do 😁
But before we dive in, let’s start with the basics, shall we?
There are two types of Excel watermarks:
- Watermark image
- Watermark text
So what are their differences you ask 🧐
Watermark image is using a picture to embed a watermark on the worksheet.
Watermark text on the other hand is using words to create the watermark.
But enough of the terminologies and let’s head straight in!
Note that Excel has no dedicated or built-in watermark feature 😭
But the good news is that it can be achieved easily by using the Header & Footer menu in Excel!
Follow the below steps using the sample workbook provided:
Add a Watermark image in Excel
- On your Excel ribbon, go to the Insert tab

- Under the Insert tab, go to the Text section at the right-most part of the menu

- Under the Text section, click on Headers & Footer

- Note that clicking the Header & Footer will change the page layout view 🙀
But do not worry as it can be changed to a normal view once we are done.

Interesting isn’t it? Let’s try and add a watermark image first 😁
- You should be seeing three boxes in the Header section.
You may double-click any of those but for this exercise, let’s use the middle one

- Once clicked, a new menu named “Header & Footer” will appear on the Excel ribbon

- Click Header & Footer menu and select Picture under Header & Footer elements.

- Click Picture and select an image you want to use
Let’s choose from a file option as it is the most common method to get an image

- Once you have selected an image, Excel will read the picture as a code &[Picture]
You should have the same Header section box as mine now

- Click on any part of the worksheet to deselect the box
Doing so will apply the watermark in the Excel sheet 😊

Adjusting the watermark image in excel
We have successfully added the watermark image in Excel 🎉
But it looks kind of odd, isn’t it?
The good thing is we can adjust the image to our liking!
Let’s try adjusting the position of the watermark!
- Select the box where the image watermark is located

- Move the cursor to the leftmost part of the Picture code (before &)

- Add line breaks by pressing enter

- Click on any part of the worksheet to deselect the box

What if we want to resize the image?
- Click the header box where the picture is located. This is the same as the first step in adjusting the position of the watermarks.
- Under Header & Footer > Header & Footer elements, select Format Picture

- Clicking the format picture will prompt a format picture option box

You may now easily resize the watermark in Excel by adjusting the Height and Width of the image
- Click Ok once you are done with the resize

- Click on any part of the excel worksheet to deselect the box
Always enable the Lock Aspect Ratio under the format picture option. This will make picture watermarks more intact and not distorted due to the change in size 🤩
Add a Watermark text in Excel
- The first set of steps is identical to adding a watermark image 😙
Go to Insert Tab > Text Section and select Header & Footer
- Select any of the three boxes under the headers

- This box will now act as a text box. You can type in any word you wanted to add as a watermark

Excel will set the font size to 11 by default.
You may opt to change the font size by going to the Home tab

- You have the option to add the watermark here. But it will show at the top part of the excel spreadsheet 😭

- To adjust, select the header box and add enough line breaks. Up until it reaches the desired position on the worksheet.

- Click on any part of the worksheet to deselect the box 😎

You can also change the font color of the text watermarks in Excel. Just go to the Home tab and choose your desired font color!
Printing the Excel sheet with watermarks
You have now added the Excel watermark but you need to check first if it looks nice when printed.
Let’s discuss it here!
But first, we will change the page layout view to the normal view. This way we can see the document without any watermarks.
Note that changing the page layout view will not remove the watermark in Excel.
It can still be viewed or edited by going to the Header and Footer menu
- Go to the View tab

- Select Normal under the Workbook views

Now that is it back to Normal view, let’s check how it looks when printed!
- Go to File

- Select Print

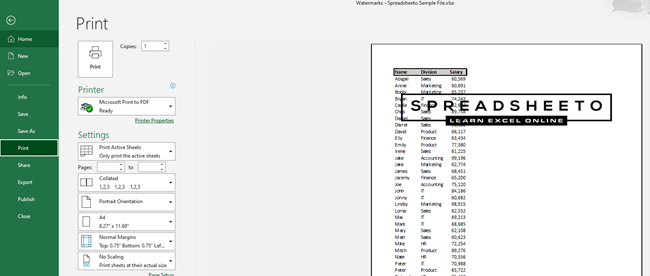
- You will then be directed to the print preview page.
As shown below, this is what a printed worksheet would look like 😇

You may also modify the format of the sheet before you print it.
Just go to Page Layout > Page Setup and play with the settings!

How to remove a watermark in Excel
Now that we know how to insert watermarks, let’s discuss how to remove them
This is a very simple task and will not take even a minute 😲
This is also applicable for both word and image watermarks!
- The first set of steps is identical to adding a watermark in Excel
Go to Insert Tab > Text Section and select Header & Footer
- Select the header box of the inserted watermark

- Highlight the image or word used for the Excel watermark. Press backspace or delete

- Click on any part of the sheet to deselect the box

There you have it! That is very straightforward, right?
More than one watermark is not allowed per header box 😥
This means that you can only use up to 3 watermarks.
But the good news is that they can be a combination of word and image watermarks 😍
That’s it – Now what?
You made it this far ✈
Well done!
And I believe you have already mastered the art of adding watermarks in Excel😎
It is simple yet a very useful tool if you want to put a “copyright” on your Excel masterpiece.
Do you know that aside from watermarks, other Excel features can also assist you with your daily tasks?
Do you need to clean your data before adding watermarks? Then Text functions LEFT, RIGHT and MID are your friends!
You will learn them (and much more) for free when you join my 30-minute email course!
Other resources
If you like this tutorial, then perhaps adding comments in Excel will pique your interest as well. A powerful tool especially when you are sharing the spreadsheet across your organization!
How about learning advanced project management tools? This will level up your project management skills! Read it here 😊
I hope you find this article helpful!
