How to Remove Time From Date in Excel (2024 Guide)
Excel offers a variety of ways how you can present dates. Could be a short date, a long one with the date and the day, or the one with a timestamp to it.
However, at times, you might not want your date in Excel to have a time stamp ⌚
Is there a way you can get rid of it?
There are many ways how you can remove timestamps from dates in Excel.
And in the guide below, I am going to teach you all these ways. Click here to get our free sample workbook here and slide in straight.
Table of Contents
Remove time from the date by hiding it with formatting
Here we have some dates that have timestamps to them.
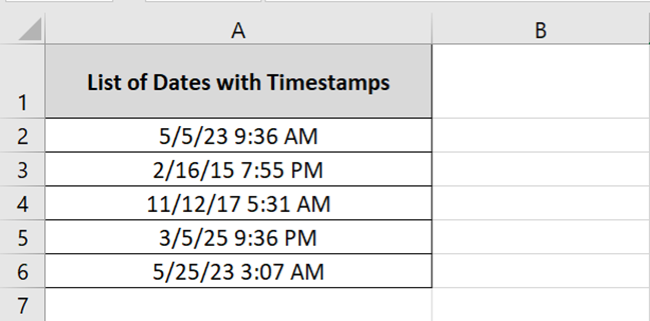
The first and easiest way to remove timestamps from these dates is to change their formatting. Follow these steps to do it 👇
- Select the cells containing the dates with time.
- Go to the Home Tab > Number > Format options.

- From the drop-down list, click on More Number Formats.
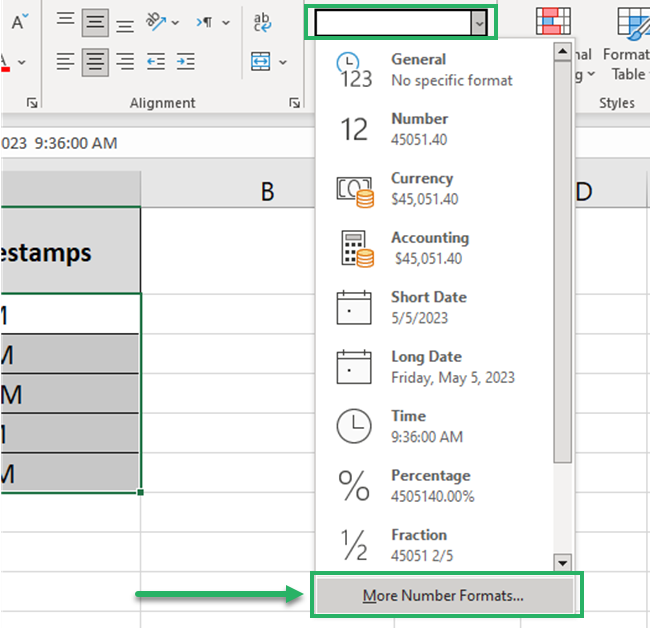
This will launch the Format Cells dialog box 📝
Alternatively, press the Control Key + 1 to launch the Format Cells dialog box.
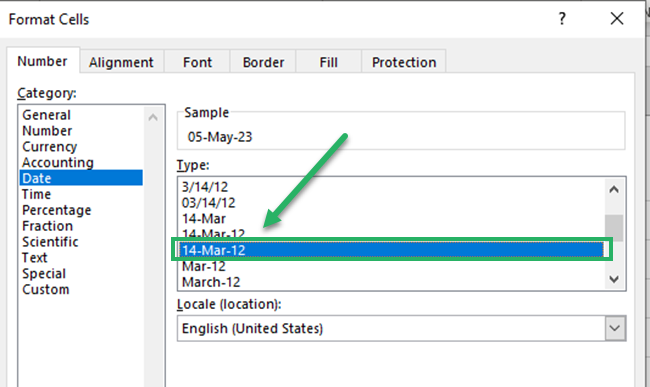
- From the left pane of the Format Cells, go to Date.
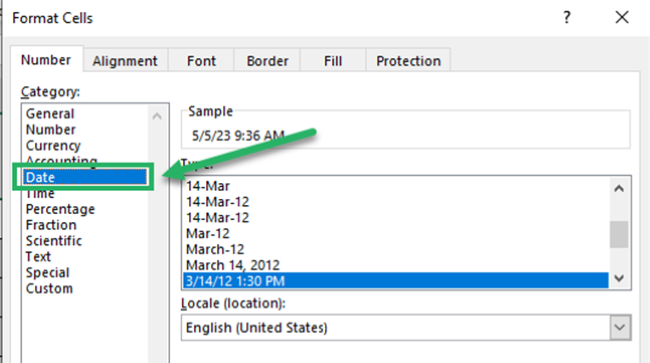
You’d see all the date format types in the Format Cell dialog box below 👀
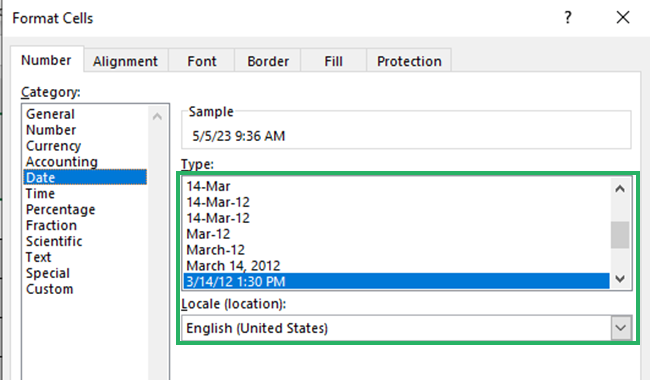
- Select a date format without any time stamp.
- Click Okay.
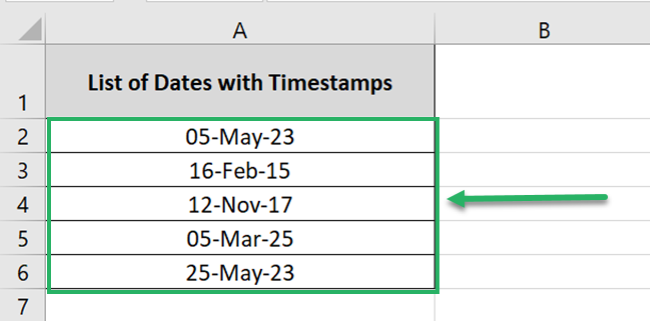
Tada! No more time stamps to your dates in Excel 😍
Remove time from the date with formulas
Why only formatting? You can also remove time from dates in Excel using formulas.
Pro Tip!
Dates in Excel are serial numbers where 1 equals 01 January 1900. And every next date is a successive serial number 💡
Similarly, dates with time stamps are numbers with decimals. For example, the number 1.5 equates to 01 January 1900, 12:00 PM in Excel.
You can use different functions to remove timestamps from dates in Excel. The first function that we will use to do this is the INT function.
INT Function
INT stands for Integer, and it simply removes the decimal places from a number and returns the whole number before the decimal 🚩
Dates in Excel are numbers, and timestamps are decimal places after numbers.
So if you remove decimals from a number (using the INT function), the dates will no longer have timestamps. Let’s try doing this now.
- Activate a new cell.
- Write the INT function as below.
= INT (A2)
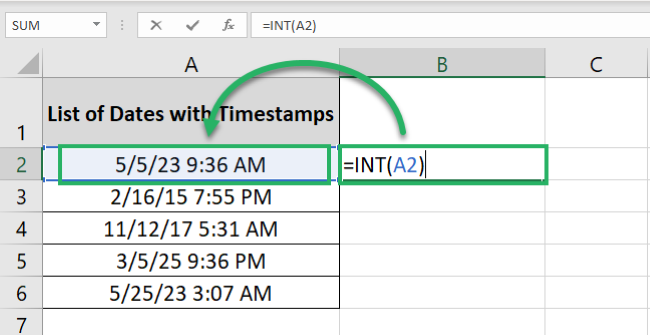
We have referred to Cell A2 which contains the date with the timestamp 😎
- Hit Enter.
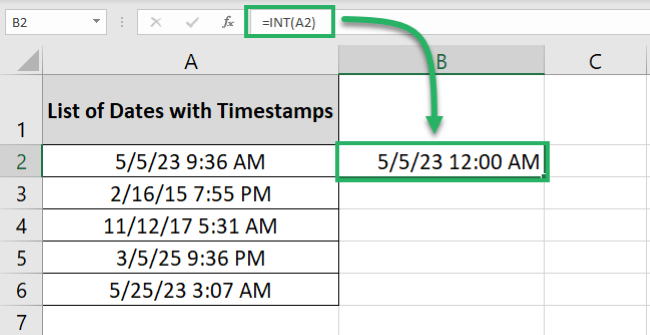
- Drag and drop the results to the whole list.
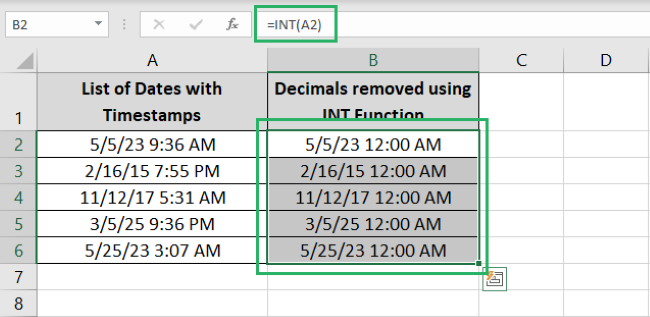
But wait 🤚 We don’t see the timestamp removed.
Only the time is changed to 12:00 AM (which means zero). This is because the format is still set to date + timestamp.
To change it:
- Select the dates.
- Go to the Home tab > Format Numbers > More number formats.
- Go to Date format from the left pane.
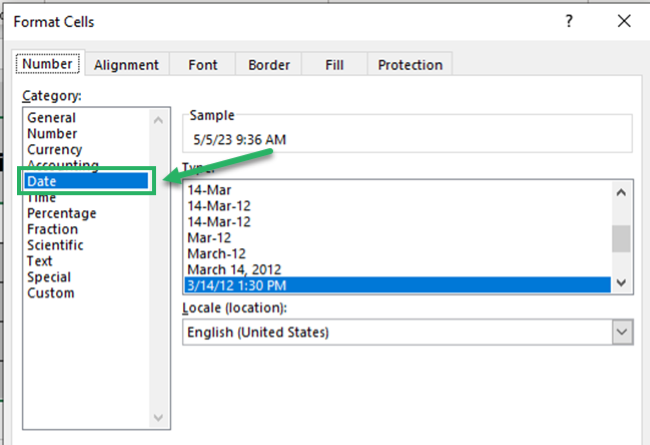
- Select the date type with no timestamp to it.
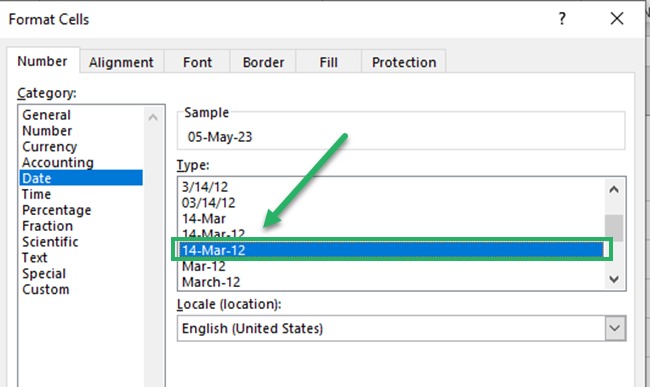
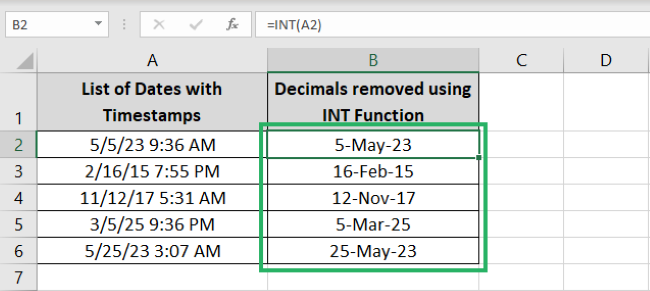
- Click Okay and there you go!
Pro Tip!
Merely changing the format of dates to get rid of the timestamp will keep the time there. It will only change the way that date is displayed 🧐
However, using formulas will help you get rid of the decimals that represent timestamps.
DATEVALUE & TEXT function
The second function that you can use to remove timestamps from dates in Excel is the DATEVALUE function together with the TEXT function.
How to use that? Let’s see here 👀
- Write the TEXT function as follows:
= TEXT (
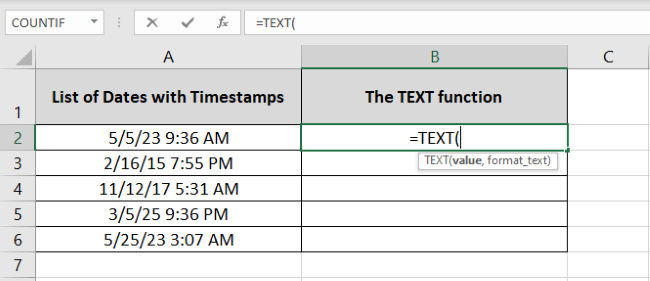
- As the first argument, refer to the cell that contains the date with the timestamp.
- As the second argument, define the format in which the text must be returned.
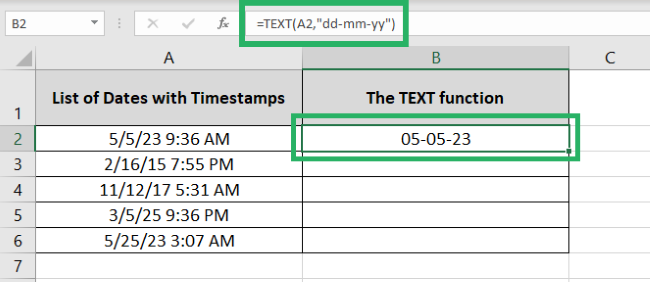
= TEXT (A2, “dd-mm-yy”)
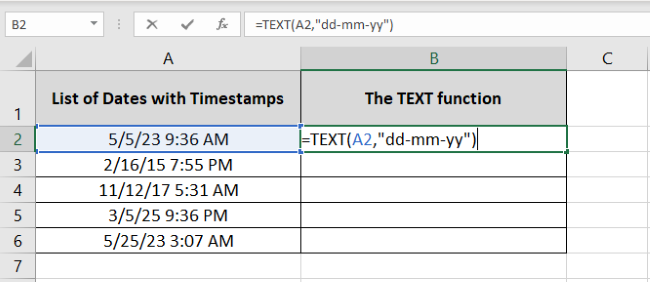
Cell A2 contains the date. And we want the date to be converted to text but the format to be dd-mm-yy. So, we have defined the same enclosed in double quotation marks 📜
Here are the results.
- Nest the above function in the DATEVALUE function.
= DATEVALUE(TEXT (A2, “dd-mm-yy”))
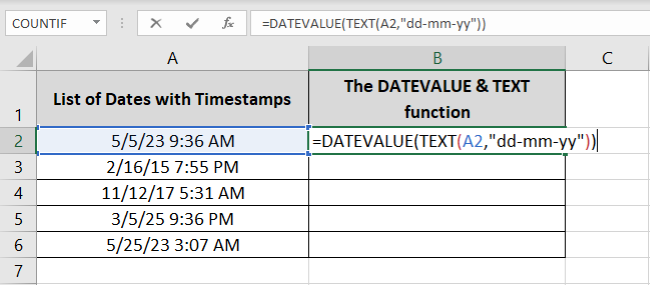
The DATEVALUE function returns the date value (serial number) for any date supplied in text format 📅
- Hit Enter to see the following result.
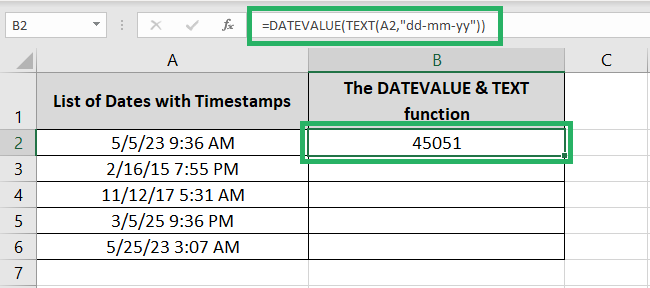
The result is a mere serial number. That’s true. But it’s only about the wrong format 💁♀️
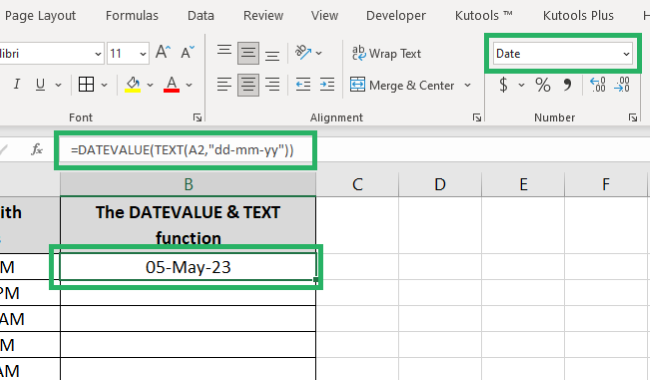
- Select the date and apply the Date Format to it (without timestamp) from Formats.
And here you have the dates without any timestamps ready!
Remove time from the date with Find and Replace
There are yet more ways how you can remove the timestamp from a date in Excel. This time it’s about using the Find & Replace function to do it 🔎
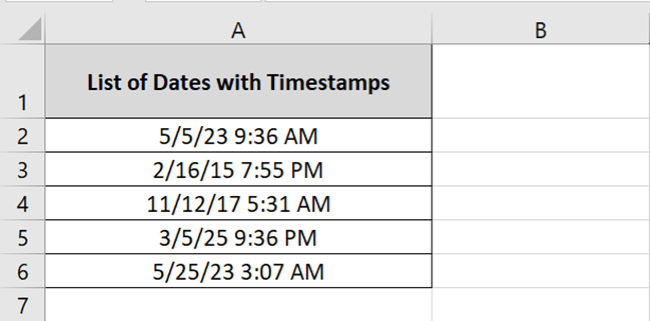
For example, your dates look like the following in Excel.
To use the Find & Replace function to remove timestamps, follow the steps below:
- Select the cell containing this date.
- Go to the Home tab > Find & Select > Replace.
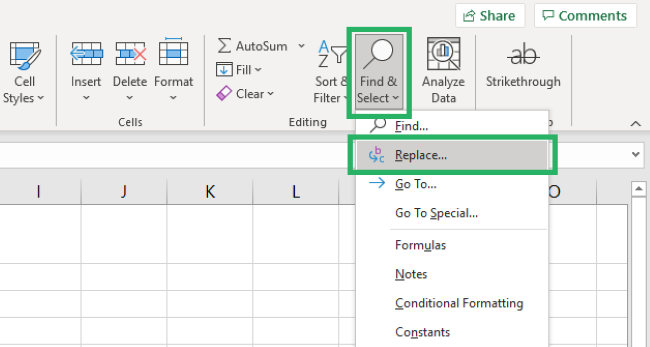
Shortcut key to launch the Find & Replace dialog box: Press the Control key + H key 🔔
You’d see the Find & Replace dialog box as follows:

- Against the box for Find, write “ *” (a space character followed by an asterisk).
- Leave the Replace box empty.
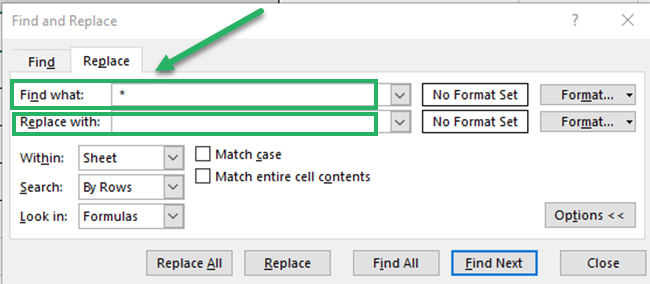
- Click Replace All. And here’s how the dates change 🙈
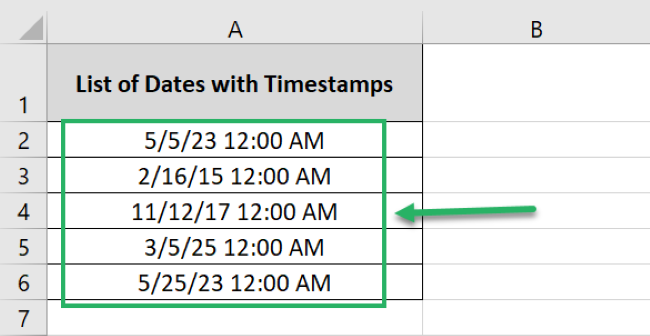
Note that the dates are still suffixed by timestamps. However, the timestamps have now changed to 12:00 AM (this means they are equal to zero or nothing).
Pro Tip!
We have used an asterisk (a wildcard character) after a space character as the characters to be replaced. This tells Excel to look out for the space character in the subject cell and replace everything after the space character with nothing ❌
For this to work, the timestamp in the cell must come after a space character. And also that there is no other space character in the cell (or else Excel will replace them all).
The Find & Replace function will remove timestamps from dates in Excel. But as long as the dates are formatted to show timestamps, they will still appear in the cell.
To remove timestamps from the dates:
- Select the dates.
- Go to the Home tab > Format Numbers > More number formats.
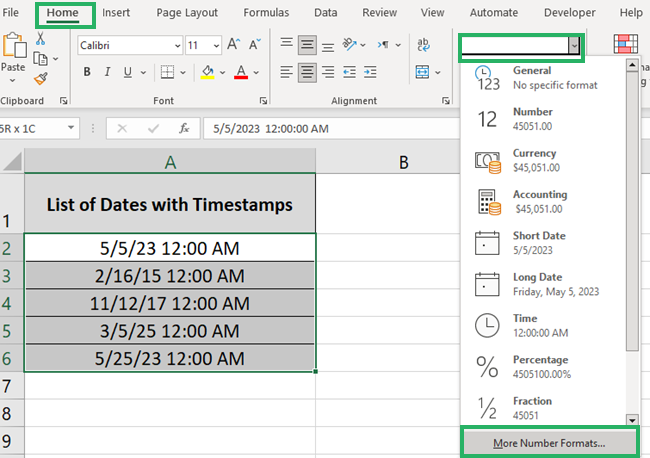
- Go to Date format from the left pane.
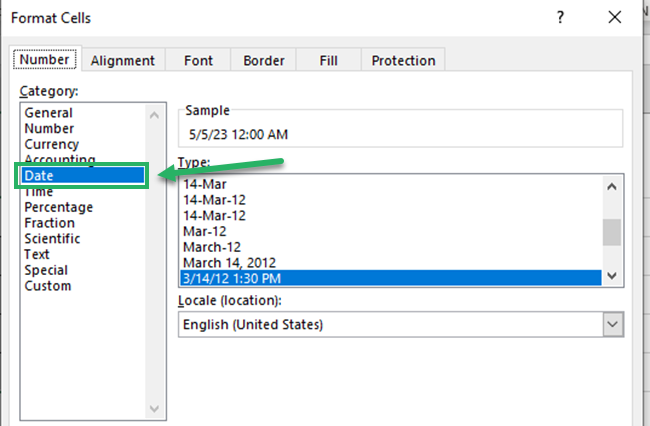
- Select the date type with no timestamp to it 📅
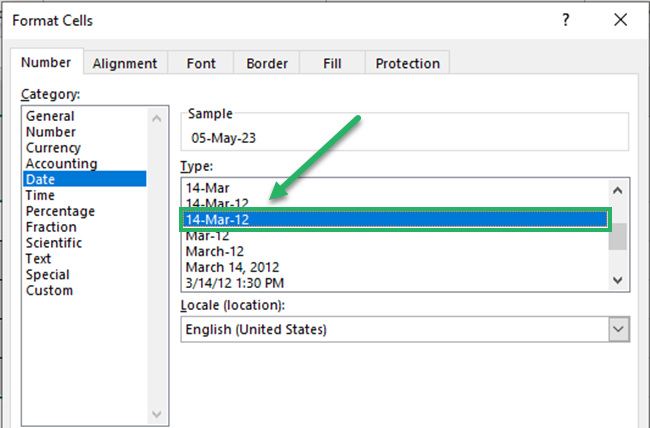
- Click Okay, and there you go!
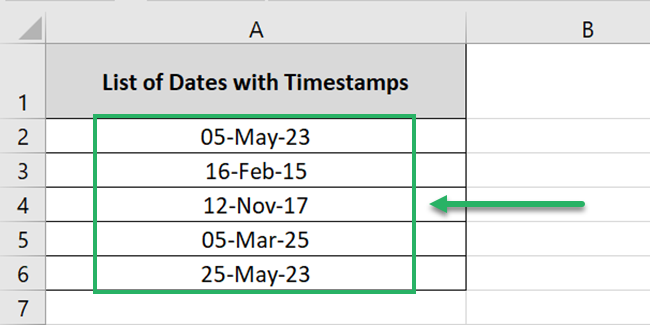
That’s how you use the Find & Replace feature of Excel to remove timestamps.
Remove time from the date with Text to Columns
What if we just cut through the dates to separate the time stamps ✂
Here we have a list of dates in Excel that have timestamps to them.
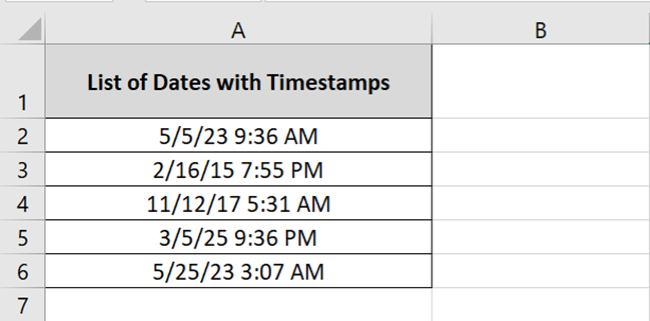
Let’s split the timestamp from these dates. To do that:
- Select the cells that from where the timestamp is to be removed 🎯
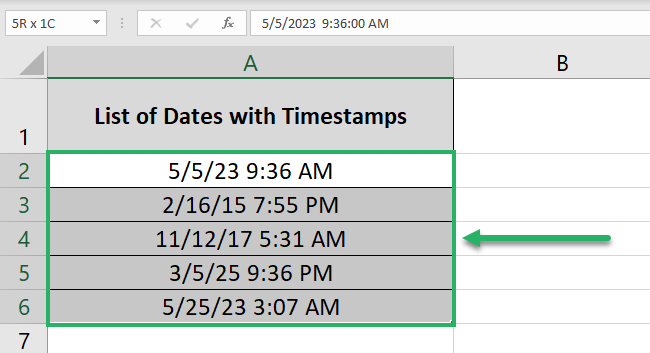
- Go to the Data Tab > Text to Columns.

Clicking on it will launch the ‘Convert text to columns’ wizard as shown below.
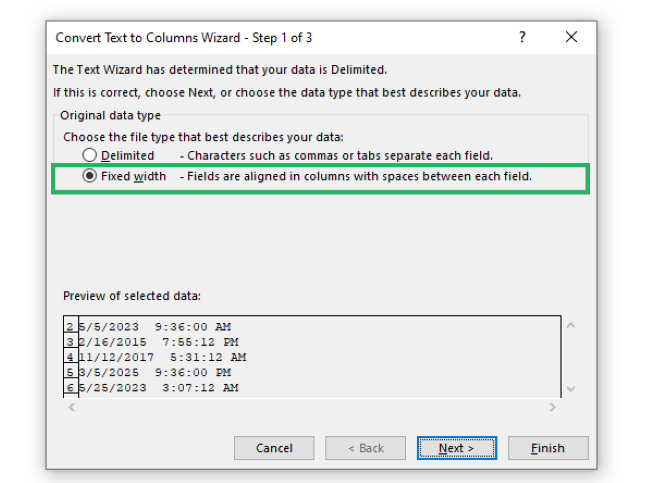
- Select the option Fixed Width.
- Press Next.
Pro Tip!
You can also use space character as the delimiter to split data between two columns as there is space between the date and time.
However, there is also a space character between the timestamp and the meridiem ⏲
Like 12:00 AM. Selecting space as the delimiter will split the date into three columns.
| Date | Time | Meridiem |
If you solely want to remove the timestamp from your date, you can go with the Delimited option. And later on, delete both the columns for the timestamp and the meridiem.
- In the next screen, drag the break line between the date and the time stamp.
You can readily preview how the split columns would look like.
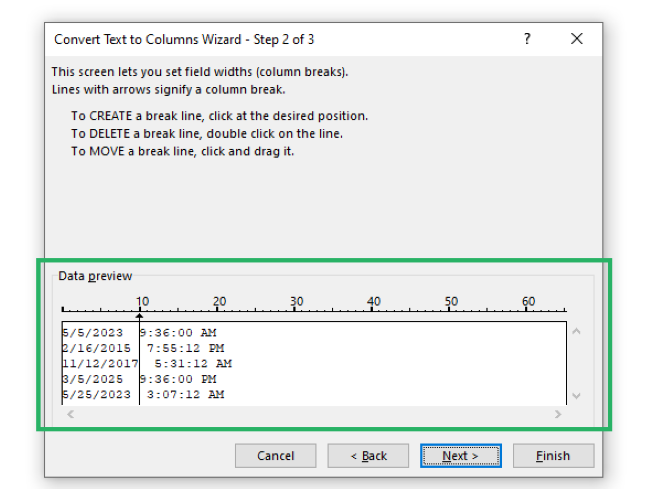
- Click Next.
- Set the format to date from this screen.
- Choose the destination where you want the split data placed. We are setting it to Cell B2:C2.
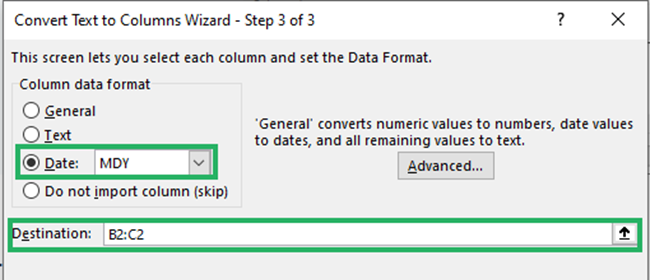
- Choose Finish.
And tada! Excel would split the dates and timestamps into two columns ✍
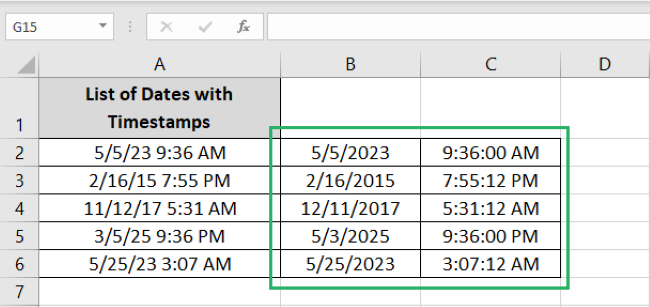
That’s it – Now what?
Until now, we have seen all the possible ways how you can remove time stamps from dates in Excel. Change the format, use Excel formulas, use find and replace or simply split it into two columns 🚀
The above guide discusses all these methods. If you liked reading this blog, I bet you’d love to know more about the interesting features of Excel.
And there are just so many tools, features, and functions in Excel for you to explore. Some of my favorite functions from Excel include the VLOOKUP, SUMIF, and IF functions.
Other resources
Like reading the article above? Learn more about date functions in Excel by reading our comprehensive blog on it here.
