How to Lock Formulas in Excel (But Allow Data Entry)
When you are sharing an Excel file with other users to work on, accidental changes in your Excel sheets are bound to happen. 😬
Other users could delete or overwrite the important data and formulas in your Excel sheet.
And that’s something we want to avoid.
In this tutorial, we’ll show you a step-by-step process on how to lock formulas in your Excel sheet while still allowing data entry. This helps you protect the integrity of your Excel file and allow collaboration for efficient work. 🙌
Download this sample Excel workbook and let’s start.
Step 1 – Unlock all cells in the Excel Worksheet
To protect the formulas in your Excel worksheet, you need to unlock all the cells first. 🔓
By default, Microsoft Excel locks all the cells in your worksheets.
To unlock cells,
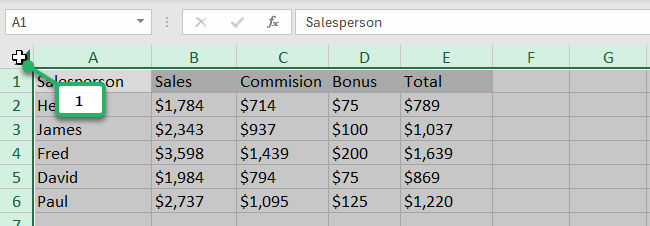
Step 1.1) Click the gray triangle on the top left corner of the sheet area to select all the cells in the worksheet. You can also Press Ctrl + A on your keyboard to do this.
Step 1.2) Go to the Home Tab.

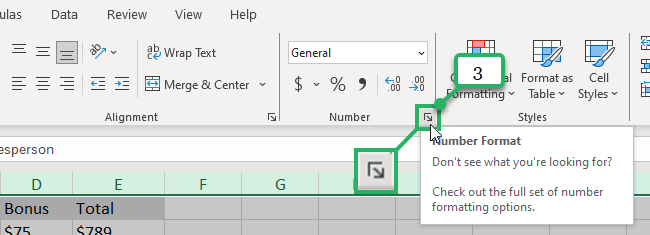
Step 1.3) In the Number Group, click on the dialog box launcher. This will open the Format Cells dialog box.
Step 1.4) Click the Protection Tab.
Step 1.5) Uncheck the Locked option.

Step 1.6) Finally, click OK.

Now, all of the cells in your worksheet are unlocked. 😊
Step 2 – Select the cells with Formulas you want to Lock
The second step is to select the cells containing formulas you want to lock. When your data is few, you can highlight the specific cells with your mouse. But if you’re dealing with rows and columns of data, selecting all the cells containing formulas can be time-consuming. 😩
You can select all the cells with formulas in your worksheet by using Excel’s Find & Select 🔍
Let’s do it.
Step 2.1) Go to the Home Tab.

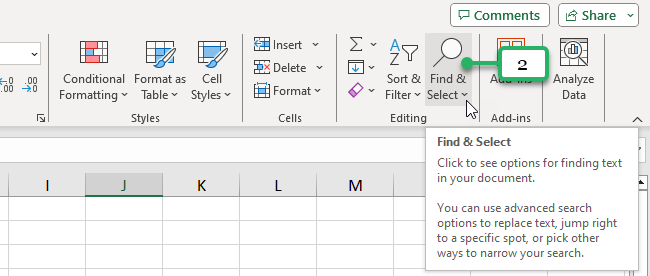
Step 2.2) In the Editing Group, click the Find & Select button.
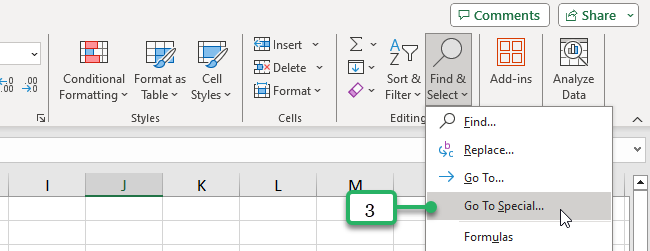
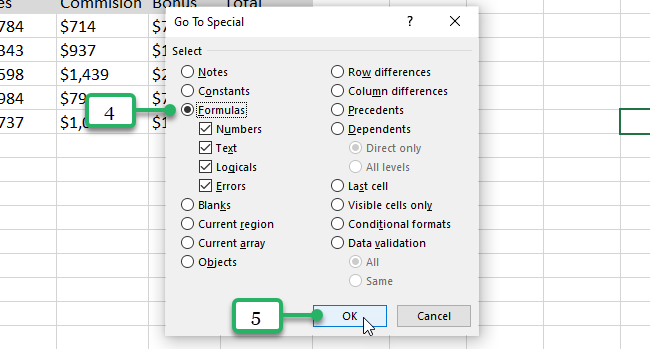
Step 2.3) Select Go To Special in the drop-down. This will open the Go To Special dialog box.
Step 2.4) Click Formulas.
Step 2.5) Click OK.
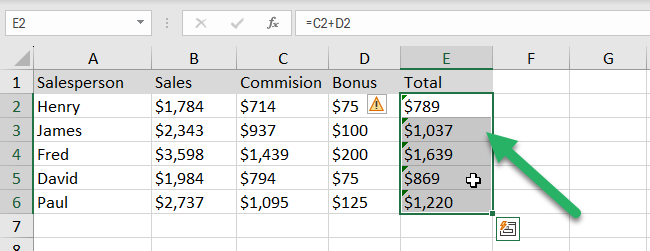
MS Excel then highlights all the cells containing formulas in your Excel spreadsheet.
Step 3 – Lock cells with Formulas
Now that the cells with the formulas you want to lock are selected, it’s time to lock them. 🔒
Step 3.1) Press Ctrl + 1 to open the Format Cells dialog box.
Step 3.2) Go to the Protection Tab.
Step 3.3) Check the Locked checkbox.

Step 3.4) Click OK.

You’ve now locked the cells with formulas. To make this work in full effect, you need to protect the worksheet.
Step 4 – Protect the worksheet
For the final process,
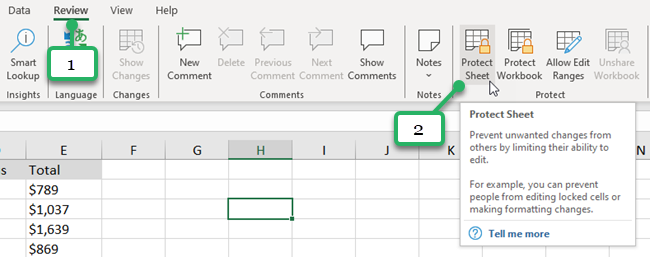
Step 4.1) Go to the Review Tab.
Step 4.2) In the Protect Group, click Protect Sheet. This will open the Protect Sheet dialog box
Step 4.3) Create a Password. This will give your worksheet extra protection for anyone who tries to make changes to it. Be sure to create a strong password and remember it, as no one will be able to edit the sheet without entering the password.
Let’s try to create a simple password for this tutorial like “1234”
Under the “Allow all users of this worksheet to” box, as you can see, two checkboxes are checked by default: Select locked cells and Select unlocked Cells.

There are other actions you can allow other users to do in your worksheets such as Format cells, Format columns and rows, etc.
For now, let’s not make any changes and just check the default ones.
Step 4.4) Click OK.

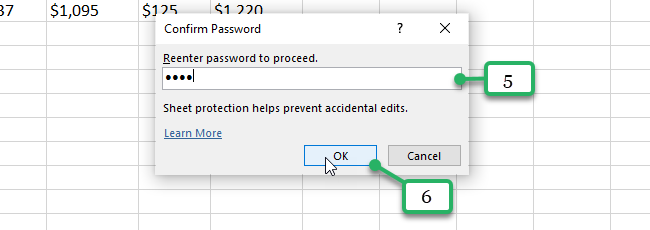
Step 4.5) Reconfirm Password.
Step 4.6) Finally, click OK.
Now this time, you’ve successfully locked the cells containing formulas in your Excel sheet. 🙌
When an Excel user tries to double-click the locked cells, Microsoft Excel sends an error message below.

You’ve protected the cells with Excel formulas while the rest of the cells can be edited and allowed for data entry.
If another user tries to make any changes to the locked cells, they can click the Unprotect Sheet button in the Review Tab. However, they need to enter the password to unprotect the sheet.
They will need your permission to make any changes to it. 🔐
That’s It—Now What?
Nice work! 👍
Knowing how to lock formulas gives you control over what you and other users can do to your Excel sheets. This way, other users can enter needed data in your Excel sheet without worrying about losing important data and formulas in the process.
If you’re interested in learning more Excel tutorials, tips, and tricks, we have 300+ articles ready for you. Read these related articles to become an Excel Pro in no time. 😎
