How to Separate Names in Excel
(Split First and Last)
Full names are usually typed into one cell.
When using options like sorting, and filtering, it is important to separate full names into first, middle, and last names💡
Excel offers numerous ways to separate names🤔
Using a few examples, we will learn four basic techniques to split names in Excel.
Download the attached Excel file and practice with me.
Table of Contents
Split names with functions
We can use Excel formulas with excel text functions to split data.
Let’s use Excel formulas to split the first and last names in the first column in the example below.

To extract the first names in Excel, we can use two different formulas.
Formula example #1 to extract first names
To simply get the first name into the first name column, use the TEXTBEFORE function.
- In column B, type an equal sign and choose “TEXTBEFORE.”
Write,
=TEXTBEFORE(

- Select the cell that contains the full name.
Let’s select the A2 cell as the Text.
Now your formula is;
=TEXTBEFORE(A2

- Enter a space character as the delimiter.
Now, the formula is:
=TEXTBEFORE(A2,” “

- Close the parenthesis and press enter.
The first name is extracted😍

Only Microsoft 365 users can presently use the above formula😕
Formula 2 to extract first names
So, let’s learn the other formula that any Excel user can apply🤗
- In column B, enter an equal sign and choose the “LEFT” function.

- Select the full name.
I select cell A2.
Now your formula is;
=LEFT(A2

- Use the “Find” function to get the number of characters in the first name.
The “Find” function helps in locating a specific character’s place.
To calculate the number of characters in first names, locate the space character and subtract 1.
The formula should now look like this.
=LEFT(A2,FIND(” “,A2)-1

Pro Tip!
In the above formula, you can replace the FIND function with the SEARCH function.
Both are very similar functions.
However, the FIND function is case-sensitive, whereas the other is not.
As we look for a space character position when extracting names, case sensitivity is irrelevant.
The formula for the SEARCH function is:
=LEFT(A2,SEARCH(” “,A2)-1

- Close the parenthesis and press “Enter”.
The first name is extracted😍

To get the last name out of the Excel full name column, we can use two different formulas.
Formula example #1 to extract last names
The simplest Excel formula to get the last name is the TEXTAFTER function.
- Enter an equal sign in the last name column and select the “TEXTAFTER”.
Write,
=TEXTAFTER(

- Select the cell that contains the full name.
So, select A2.
Now your formula is;
=TEXTAFTER(A2

- Enter a space character as the delimiter.
The formula is now;
=TEXTAFTER(A2,” “

If the full name has a middle name, then insert a comma and type 2.
- Close the parenthesis and press “Enter”.
The last name is extracted😎

TEXTAFTER is currently only available to Microsoft 365 users😒
Formula example #2 to extract the last name in Excel from the full name column
All Excel users can use the below Excel formula to extract text to the last name column 🤗
- Enter an equal sign in the last name column and select the “RIGHT” function.
Write;
=RIGHT(

- Select the full name.
So, choose cell A2.
Now your formula is;
=RIGHT(A2

- The length of the last name must then be calculated.
How many characters are in the last name? 🤔
We can figure that out using the LEN function and the “Find” function.
LEN function returns how many characters are in a text string.
So,
Number of characters in the last name =
The number of characters in the full name text string – The location of the space character

Enter the LEN function first, then reference the cell in the full name column.
Now, your formula is;
=RIGHT(A2,LEN(A2)

- Then, reduce the space character position from the above formula.
Use the FIND function to locate the first space in the cell that contains both the first and last names.
Now our formula bar should show:
=RIGHT(A2,LEN(A2)-FIND(” “,A2)

- Close the parenthesis and press “Enter”.
The last name is extracted 🤩

You now know how to separate first and last names using Excel formulas.
Let’s look at how to use formulas in Excel to split names when they have first, middle, and last names.
Each full name in the table below has a middle name.

Let’s learn to split names that have middle names.
Formula 1 to extract names with middle names to separate cells
The easiest function to separate first, last, and middle names in Excel is the TEXTSPLIT function.
- Enter an equal sign in column B and select the “TEXTSPLIT”.
Write,
=TEXTSPLIT(

- Select the cell from the full name column.
Let’s select A2.
Now your formula is;
=TEXTSPLIT(A2

- Enter a space character as the delimiter.
Your updated formula should be;
=TEXTSPLIT(A2,” “

- Close the parenthesis and press “Enter”.
First name, middle name, and last name cells are automatically filled 🥳

TEXTSPLIT removes the need to enter multiple formulas into three columns.
Enter the formula only in one column, column B.
TEXTSPLIT, like TEXTBEFORE and TEXTAFTER, is only available to Microsoft 365 users 💡
Formula example #2 to extract names including middle name
Let’s learn another formula to get the middle name from the full name column.
- Enter an equal sign in the middle name column and select “MID”.
Write;
=MID(

- Choose the cell from which to extract the middle name.
Let’s select cell A2.
Now the formula is;
=MID(A2

- Then, choose the “middle name” start position.
To do that, locate the first space and then add one.

Now your formula is;
=MID(A2,FIND(” “,A2)+1

- Enter the number of characters for the middle name.
So, we’ll use the formula below to find the last space.
FIND(” “,SUBSTITUTE(A2,” “,”@”,1))-FIND(” “,A2)-1)
Now, your formula should be;
=MID(A2,FIND(” “,A2)+1,FIND(” “,SUBSTITUTE(A2,” “,”@”,1))-FIND(” “,A2)-1

- Close the parenthesis and press “Enter” to quickly separate the middle name from the full name.

Now you know how to separate names in excel using formulas👏
Split names with Text-to-Columns
Convert text-to-columns wizard is another great Excel feature to convert text to columns.
Let’s apply the convert text to columns wizard to split text to separate columns.
- Select the full name column.
Don’t select column headers.

- Go to the data tab.

- Select “Text to columns” from the “data tools group

- Select “Delimited” and click “Next”.

- Select “Space option” and click “Next”

The data preview window will show how the full name in excel is divided into separate columns.

- Change the destination cell to B2 and click “Finish”.
Otherwise, existing data will be overwritten.

Names are now automatically filled into different columns 😜

Pro Tip!
With this Excel feature, you can even create a table with just the first and last name in 2 separate columns.

Repeat the previous steps and make the adjustments listed below in the last step.
- Select the middle name column from the data preview.

- Select “do not import column” from the “Column data format”

This is the outcome.

Split names with Find and Replace
Find and Replace is another great excel feature.
- Copy the full name list to a separate name column.

- Open the Find and Replace dialog box.
The keyboard shortcut for “Replace” is “Control + H”.
- Enter a space character and an asterisk symbol in the “Find what” and click “Replace All”.

- Click OK on the pop-up message.
Then, only the first name will remain in the column, and all remaining names will be erased.

To get the last name in Excel, enter an asterisk symbol and then a space character in the “Find what”.
Split names with Flash Fill feature
This is the simplest way to split names in Excel🤩
Excel senses a pattern and fills in the names with this feature.
- Manually type the first name in the first cell.

- Manually enter the first name in the second cell down. As you type, Flash Fill will automatically display a list of first names (in gray).

Press enter and repeat the same steps for the middle name and last name columns 🥳
That’s it – Now what?
You now know the best ways to separate names in Excel.👏
When names are separated it is easy to apply IF, SUMIF, and VLOOKUP functions to your data.
Want to master Excel basics quickly? Start with this free 30-minute course on IF, SUMIF, and VLOOKUP.
Other resources
Our article about LEFT, RIGHT, and MID Functions will help you to separate names using formulas.
Read the article about Find and Replace to learn the way to use it efficiently.
Don’t forget to watch How to Split Cells in Excel – 4 Methods on YouTube to find out more.
Frequently asked questions
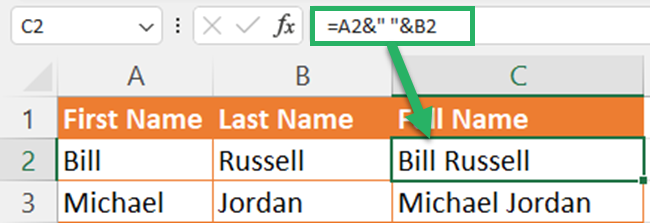
You can use the ampersand(&) method to combine text in Excel.
- Type an equal sign.
- Select the first name.
- Insert an ampersand sign.
- Insert a space character within quotation marks.
- Insert an ampersand sign again.
- Select the next name.
- Select the entire column with full names (those you want to split).
- Go to the data tab and click the Text to Columns button.
- Choose ‘Delimited’ and click ‘Next’
- Choose the ‘Space’ option and click ‘Finish’

Written by Kasper Langmann
Hi, I'm Kasper Langmann👋
I'm the co-founder of Spreadsheeto, a certified Microsoft Office Specialist, and a Microsoft MVP.
With over 10 years of experience, I’ve taught Excel to millions of people worldwide.
I spent over 16 hours researching and writing this tutorial.
Last updated on June 6th, 2025.
Before you go, sign up for my free Excel course (+100,000 students) ->