How to Track Changes in Excel
Tracking changes in Excel is a critical feature you need for managing and reviewing edits when working with a team 💻
You can use this functionality to keep a track record of all the changes made and who made what changes in the workbook. You can highlight edits, accept or reject changes, and maintain a history.
In this tutorial, we will see how you can track changes in Excel whether you’re auditing financial data or overseeing a team project using easy methods 😃
Download our sample workbook to practice along the guide in real-time.
Things to remember
Before we get into how you can track changes in Excel, let’s first go over the dos and don’ts 😉
- Not all changes made in Excel are tracked. Edits you make to cells are tracked and stored in the change history. But other edits like highlighting, aligning, formatting, formula recalculations, changing column/row width, height and hiding/unhiding are not stored
- You cannot undo changes made in Excel. Its change history keeps a record of the changes made to the Excel file only, you can manually override those but not edit them.
- You can only track changes in shared workbooks so when you turn off tracking changes in Excel, the workbook brings shared. However, some major Excel features are disabled when you use a shared workbook, sorting, filtering and formatting being some of them 🧐
- By default, the change history is retained for 30 days by default. But the next time you open it, it will show the change history for 30 days plus the days that have passed in between. But once you close it, any changes older than 30 days from today will be gone. The good news is you can set the time for how long you want the change history to be retained.
- You cannot track changes in a workbook containing tables or XML maps. If your workbook contains any of the two, remove them and then try using the track changes feature.
How to track changes in Excel
Now that we’ve seen all the things we need to know before tracking changes in Excel, let’s see how to get this thing started.
Enable Track Changes Feature
The Track changes feature of Excel is deprecated in newer versions, for Excel 2016, 2019 and for Microsoft 365. This is why you will only see the Protect group with Comment buttons on the Review tab.
But worry not, we have a solution to fix that too. Before we see hoe to use track changes, we will see how to enable it in Excel using the Customize ribbons options.
To enable it, follow the below steps.
Step 1) Open your workbook.
Step 2) Go to the File option and select Options at the bottom left corner.
Step 3) The Excel Options dialog box will appear on the screen.
Step 4) In the dialog box, select Customize Ribbon from the Categories.
Step 5) Under Choose Commands from, select All Commands.
Step 6) Under Main tab, scroll down and select Review tab.
Step 7) Select New Group from the bottom.

Step 8) It will appear under the Review tab.
Step 9) Right click it to rename it.
Step 10) The Rename dialog box will appear.
Step 11) In the dialog box, enter the name, Track changes.
Step 12) Press Ok.

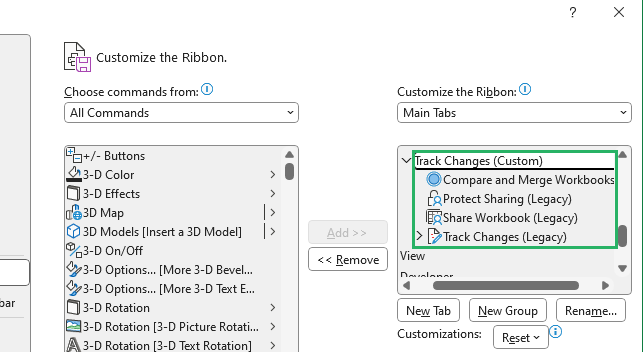
Step 13) Go to the Commands list and select the following four commands and drag them to the Track changes group.
- Track Changes (Legacy)
- Compare and Merge Workbooks (Legacy)
- Share Workbook (Legacy)
- Protect Sharing (Legacy)
Step 14) Once done, press the Ok button and close the Excel options window.

Now, in the Excel Review tab you will have a new group with four different buttons.

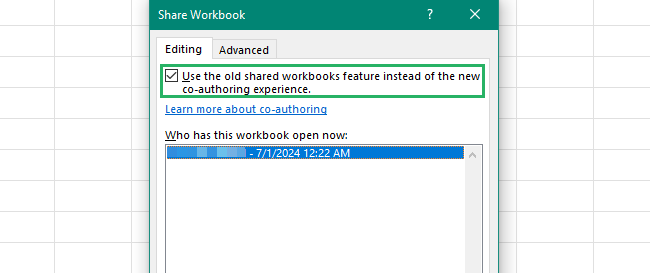
Step 15) Click on Share Workbook to enable the Accept/Reject Changes options.
Step 16) Select the Use the old shared workbooks feature instead of the new co-authoring experience option.
Step 17) Check who has access to the workbook now and add or remove a user.
Step 18) Press Ok.

You should now be able to access all features of the Track changes section. Now, follow the below steps to turn on track changing in Excel.
Turn On Track Changes
By default, the tracking changes feature is turned off in Excel. To turn it on,
Step 1) Go to the Review tab and select the Track Changes button from the Changes group.
Step 2) From the drop-down menu that appears, select Highlight Changes 🚩

Step 3) The Highlight Changes dialogue box will appear on the screen.
Step 4) Check the Track changes while editing. This also shares your workbook. option.
Step 5) Under the Highlight which changes box, select the time and people whose changes you want to see in the Excel sheet – we chose all times and everyone.
Step 6) Check the Highlight changes on the screen option 💻
Step 7) Press Ok.

Excel will now enable the Track Changes feature in your workbook and will highlight any changes that are made to your workbook from this moment onwards.
If your file is not already saved, Excel will show a pop-up asking to save the file before it enables the track changes. If it is saved, Excel will save its latest version nevertheless.
Accept or Reject Changes
Excel gives the creator of the workbook the option to accept or reject the changes made by the teammates in the workbook. But for that to work, you need to turn on this feature.
To do that,
Step 1) Go to the Review tab and select the Track Changes button from the Changes group.
Step 2) From the drop-down menu that appears, select Accept/Reject Changes.

Step 3) The Select Changes to Accept or Reject dialog box will appear on the screen ✅
Step 4) Under Which changes, select when you want to accept or reject changes – we chose not yet reviewed.
Step 5) In the Who box, select who you want to accept or reject from – we chose Everyone.
Step 6) Leave the Where box empty as it will be in the workbook only.
Step 7) Press Ok.

Excel will show you the changes made in the workbook one by one, you can choose to accept or reject one by one or do it all altogether.
If there are no changes to accept or reject, Excel will show a prompt.

Easy, no? 😀
Whether you accept or reject, the changes will still be highlighted in your workbook. You can turn them off by disabling the track changes feature as a whole.
Highlight Changes on Screen
The highlight changes on the screen are turned on when you turn on the Excel track changes feature in your workbook.
Excel highlights the row numbers and column letters in an almost maroon colour. The cells are highlighted in different colours depending on the person who edited the cells.
It colours the cell borders and a triangle at the top left corner of the cell. You can hover over this triangle to learn more about the person and time of change 🤠

Isn’t this fun? Try it now! 🤓
Set Timer for Duration of Keeping Change History
The default settings are to keep the change history for 30 days and delete any previous changes. If you want to keep the changes for a longer period, here’s how you can do it 🤔
Step 1) Go to the Review tab and select the Share Workbook button from the Changes section.

Step 2) The Share Workbook dialog box will appear on the screen.
Step 3) Select the Advanced tab from the dialog box.
Step 4) Under Track Changes, select the number of days you want to keep the change history.
Step 5) Press Ok.

And it’s done! The change history will not retain the changes made in the last 60 days until you delete or change the settings 😉
Open Change History in a New Sheet
If you prefer seeing the changes made in your workbook on a new sheet instead of highlighting it in the data set, you can use the new sheet history listing feature of Excel 🧾
It creates a new Excel spreadsheet with a detailed log of all the changes made, the time and the names of people who made the changes.
To do that,
Step 1) Go to the Review tab and select the Track Changes button from the Changes group.
Step 2) From the drop-down menu that appears, select Highlight Changes.

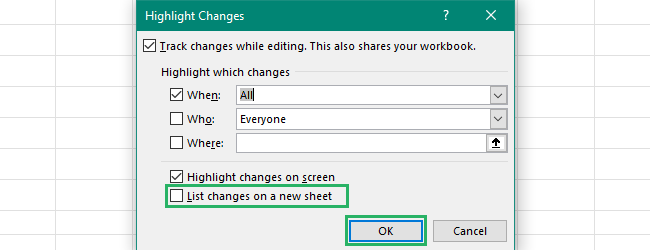
Step 3) The Highlight Changes dialog box will appear on the screen.
Step 4) If the track changes feature is turned on, only check the List changes on a new sheet option.
Step 5) Press Ok.

Tada! It’s done! 👍
This will create a new worksheet named History Sheet with logs of all the changes made. It shows everything about the changes, when it was made, who made it, the change of data and more.

The table created has an Action Column which is filled with Won or Lost. Track changes feature sets Won, when changes made to the same cell by different users, are kept. If the changes are overridden then it fills the cell with Lost ❌
Here are some things you need to remember when creating a new worksheet to save changes history.
- Make sure to save your Excel workbook before you use the Change History option as it only displays the saved changes.
- Uncheck the List changes on a new worksheet in the Highlight changes dialogue box or save your workbook again to remove the History sheet from your workbook.
- If all the changes made in the workbook are not being displayed in the History worksheet, choose All in the When box, and leave the other boxes empty.
Turn Off Track Changes
If you don’t want to track changes in Excel any longer, you can easily turn this feature off. The process is the same as turning it on.
To disable track changes in Excel,
Step 1) Go to the Review tab and select the Track Changes button from the Changes group.
Step 2) From the drop-down menu that appears, select Highlight Changes.

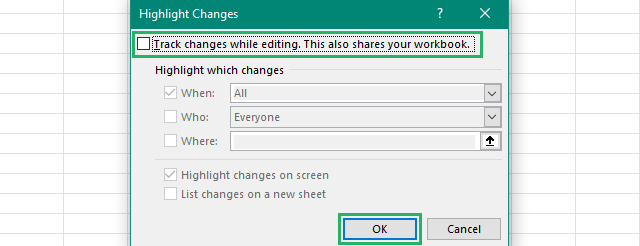
Step 3) The Highlight Changes dialog box will appear on the screen 💻
Step 4) Uncheck the Track changes while editing. This also shares your workbook. option.

Done! The track changes feature has now been turned off. Wasn’t that easy? 😎
Conclusion
In this guide, we saw how to track changes in Microsoft Excel. This included learning how to turn track changes on and off and highlighting changes made on screen.
We also saw how you can determine the duration you want to save change history for. The track changes feature also allows you to accept or reject the changes made by your coworkers in the workbook 📗
You can also choose to view the change history in the same sheet or a different one and even track the last changed cell.
To learn more about Excel, check out the articles below.
How to Color Cells in Excel (Many Examples Explained)
How to Highlight Every Other Row in Excel: Step-by-Step (2024)
How to Duplicate a Sheet in Excel (3 Methods)
We hope you enjoy reading this article as much as we did crafting it! 🤗
