How to Print Gridlines in Excel: Step-by-Step Guide (2024)
Gridlines in excel are those light gray colored lines separating cells in the worksheet.
Do you know how to make them appear on the print preview screen? Or change their color?
If not, the below article will teach you all about printing gridlines in Excel.
To follow the guide below, download our FREE sample workbook here.
That being said, let’s dive into this article right away. 😃
Table of Contents
Method #1: How to Print Gridlines (from Page Layout)
The gridlines appear on an active spreadsheet by default. But we need them for the printed worksheets, right? You will need to manually enable them for that purpose.
An easy method to do that is through the Page Layout tab. It is visible on the ribbon as:

Click on the Page Layout tab.
Move to the Sheet options group.
Click the Print check box under Gridlines in Sheet Options.

Once you click Print, the gridlines will appear on the printed sheet and the preview mode.
Pro Tip!
Sometimes the Sheet options group turns up gray or inaccessible on the Page Layout tab. That’s because you have some other object selected in your worksheet.
Cancel the selection by clicking anywhere on the sheet. The check box group should be accessible then.
The grid lines will begin appearing on the printed sheet. You can have a look at how the printed worksheet will look in the print preview mode from the File menu.
There’s one thing we must mention here. It is possible that the gridlines don’t show up even after following the process properly.
This happens for both the printed worksheet and the preview window. A common reason for this is the Draft quality check box being enabled.
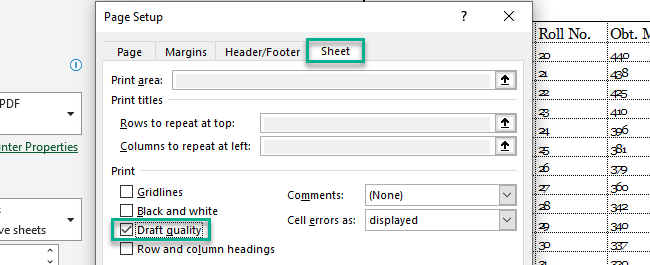
You can find it under the Sheet tab in the Page Setup dialog box. Or you can use a shortcut to access it: Alt + P, S, P.
In the image above, the printing gridlines are not visible. You can see two checkboxes are marked, one of which is the Draft quality option.
To bring back the gridlines:
1. Uncheck the Draft quality box.
2. Click ok.
The gridlines shall be visible now.
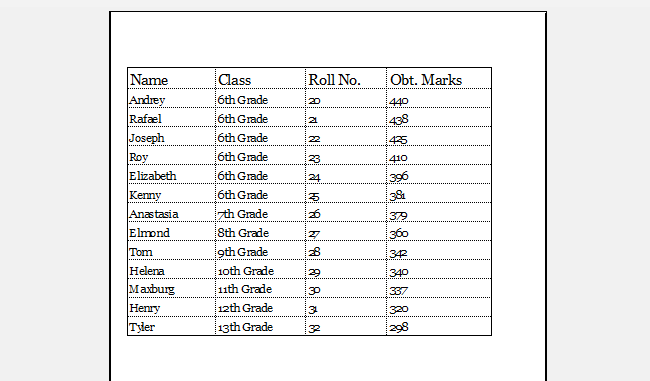
Pro Tip!
There’s a chance the gridlines refuse to print successfully — even after all this struggle. 😒
However, any issues with the software or wrong usage should have been fixed by now. If the gridlines still don’t show up, perhaps your printer driver is defective. Such printing issues are common.
All you need to do is go to the printer manufacturer’s website and install the latest driver. The printing gridlines shall appear after this.
Method #2: How to Print Gridlines (from Print Preview)
Now that you know how to print gridlines through the page layout tab let’s try the print preview method.
1. For this, select the worksheet.
2. To choose more than one worksheet, press the CTRL button, hold it, and click on the sheets you want to print.

Multiple sheets will be selected instantly.
Pro Tip!
When you select multiple worksheets, you will see the word [Group] on the title bar. This shows that your selected sheets have been grouped. To ungroup sheets, click on any unselected sheet or create one by clicking the + button.
You can also cancel the selection by right-clicking the sheet tab. A drop-down menu will appear – click ungroup sheets. The sheets will be ungrouped.
3. Once you’ve selected the desired worksheets, click on the File tab.
4. Scroll down and click the Print button.
The print preview mode will look like this:
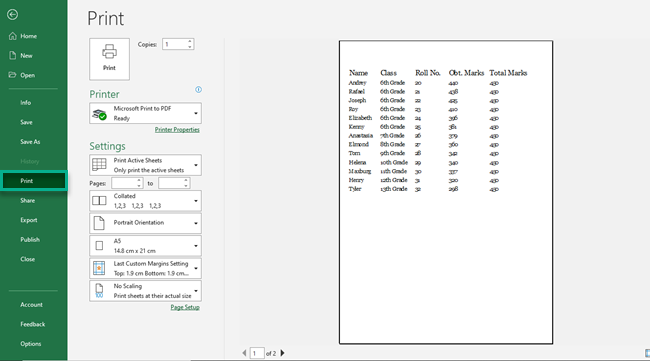
5. Now, to add gridlines in excel, click on the page setup launcher tool at the bottom

The page setup dialog box will appear on the screen.
6. Click on the Sheet tab in the page setup section.

7. On the sheet dialog box, under the Print option, mark the Gridlines check box.
8. Once done, click Ok.
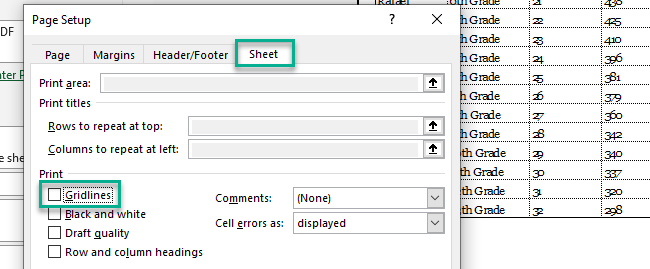
The gridlines show up now, and your selected sheet in the print preview mode will look like this:
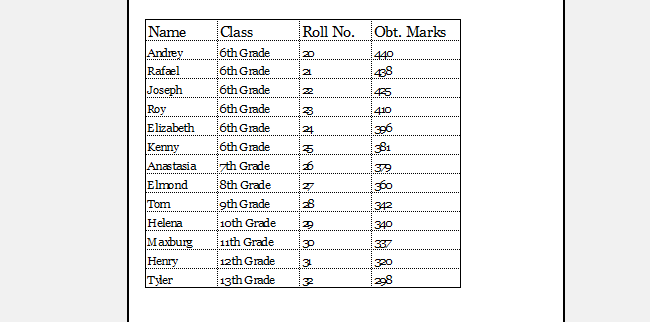
Your preview page should look like this once you have turned on the printing guidelines.
9. To print the worksheet, click the print button or use the keyboard shortcut – CTRL + P.
Excel will show a prompt confirming the printer driver.
10. Set a name for the print output, and you have your worksheet printed with gridlines. 😊
Method #3: How to print all the gridlines
You already know how to print gridlines in Excel. But that only prints the gridlines containing the data. Right?
How do you print some or all the gridlines on a worksheet? Even the ones that are empty. Well, there is a not-so-secret way to do it.
By default, Excel only lets you print the grid lines separating cells containing actual data. To directly print empty cells, you need to add them to the print area on the worksheet.
And change the printer settings to Print Selection instead of Print Active Sheets.
1. Go to the File tab > Print.
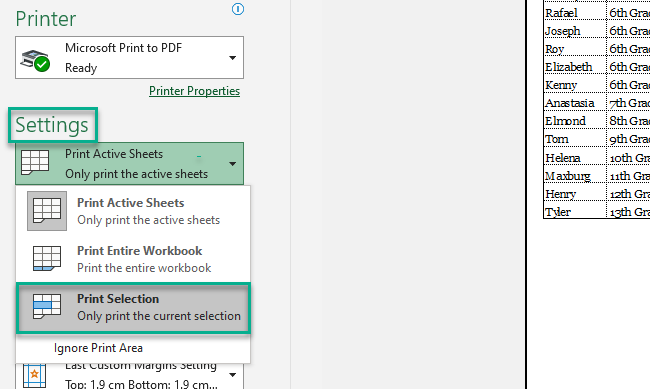
Once selected, the entire print area, including the empty cells on the worksheet, will appear in the preview mode as:
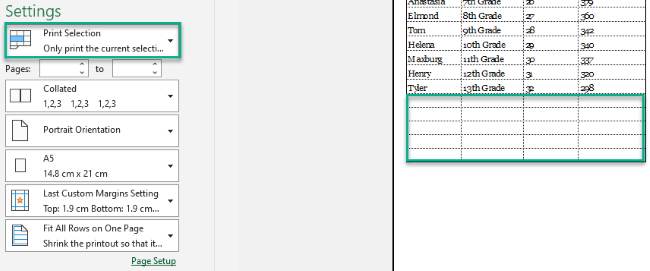
If this seems confusing, you can try another method.
1. Apply borders around the cells you want to print. It will look something like this:
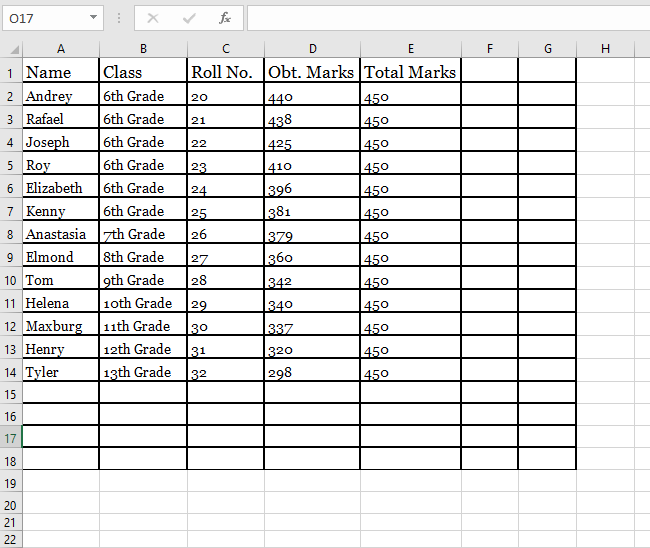
2. Press CTRL + P to go to the Preview screen and view the cells.
The gridlines will appear even if you unselect the Print Selection option. See the image below for reference.
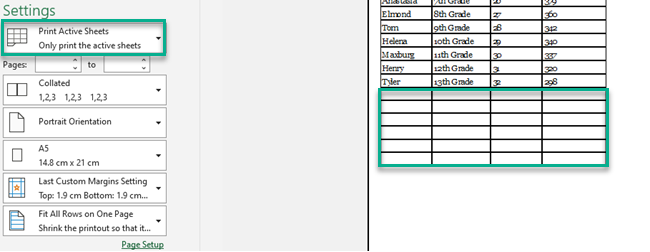
The printing gridlines containing empty cells appear on the screen with borders.
That’s it – Now what?
If you have made it here, you must have learned how to print gridlines in excel. It’s fun, simple, and fairly easy.
With a little more practice, you will become an expert in printing guidelines. 😉
But this barely covers a single aspect of Microsoft Excel. To have a strong grip on this spreadsheet software, you must master the fundamental functions of Excel.
This list starts from VLOOKUP, IF, and SUMIF functions and up to the advanced functions in Excel.
So, if you want to learn them (and more!), enroll in my 30-minutes free email training course now and kickstart your Excel journey.
Other resources
Knowing how to print gridlines in Excel is a very helpful tool, especially if you have to print worksheets frequently.
If you like the above article, you will be interested in similar topics. Check out our guide on Printing an Excel sheet and Inserting a Check box in Excel here.
