How to Embed Power BI Dashboard on a Website
Embedding a Power BI dashboard on a website is a game-changer for individuals and organizations who want real-time insights and data sharing.
It transforms raw data into dynamic visuals that users can interact with without the need for any downloads or software 😮
Embedding a Power BI dashboard on a website is most useful when you’re showcasing analytics to a customer, adding a new feature to a webpage, or sharing performance metrics with a team.
The best part is that you don’t need programming expertise to do it. All you have to do is copy and paste the code 📃
In this tutorial, we will see how to embed a Power BI Dashboard on a website and make it available to the public in seconds.
What is embed in Power BI?
Working with a team, you often need to share your dashboard with colleagues to get real-time feedback and comments 😃
Power BI offers to embed your dashboard on a website to share with everyone. You can share your dashboard in Power BI via:
- Creating workspaces
- Using the ‘Share’ function
- Printing reports
- Bundling reports and dashboards into apps and distributing them
- Embedding reports to websites and portals
Initially, there was only one way you could embed a dashboard to a site and that involved publishing the dashboard publicly so everyone could see it.
But the new update in the embed option allows you to easily and securely embed dashboards to websites and internal web portals where only registered people can view your dashboard.
Let’s first see how to embed and publish a dashboard publicly before we learn to embed it privately 🤫
Embedding on a public website
Embedding your dashboard on a website publicly is as easy as a walk in the park. The only disadvantage, however, is that anyone can view your published content.
Make sure that the content you publish doesn’t cover any confidential or proprietary information that shouldn’t be on the internet 🌐
Say, this is the dashboard we want to publish publicly.

To do that,
If you’re in reading view:
Step 1) Click the File icon on the menu above the canvas.
Step 2) Then, hover your mouse over ‘Embed’ and click ‘Publish to web (public)’.

If you’re in edit mode,
Step 1) Click the File icon on the menu above the canvas.
Step 2) Then ‘Publish to web’.

If you are using a work or school account, Power BI will show a prompt that requires you to contact your admin to
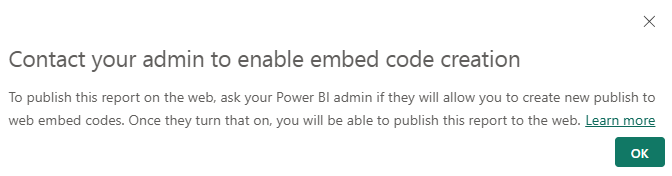
When you click the button a prompt will appear on the screen reminding you that you are publishing on a public website.
Step 3) Press Create embed code to continue.

To emphasize the severity of what we’re doing, Power BI will warn one more time that the embed code you are about to create will be shared publicly ⚠
Step 4) Press Publish on the dialog box.

Once done, Power BI will prompt a Success dialogue box that will show the link and iframe code as:

- Link you can send in the email refers to the link you can send to people on social media, mail and other places. They can view the dashboard in full screen in another tab using that link.
- HTML you can paste into your blog, as the name suggests, is the link that lets you embed Power BI content directly to your website.
- Iframe (Inline Frame) is an HTML element that allows you to display content from other sources on your webpage acting as a window to the other source. The website could be your own blog, your organization’s website or something else 🤩
- You can set the size as you would like the dashboard to fit on the webpage.
- The placeholder icon lets you add an image to make your webpage load faster. People see an interactive button on the screen while the webpage loads to keep their attention.
If you created an embed code for this dashboard before and are publishing this to the web again, you won’t be able to set the placeholder image. You can create only one embed code for one dashboard.
Make sure to copy the link and iframe code once you’re done making all these changes or they won’t appear on the website.
This is what the dashboard will look like on the website after being published.

The dashboard is interactive just as it is in reading mode – clicking on a tile will take you to its report in another tab. Since it is public, no authentication is required to access the dashboard.
It wasn’t difficult embedding a dashboard to a website now, was it? Try it now! 😉
Embedding securely on a website
Embedding a dashboard securely on a website is a relatively new feature. It lets designers and developers embed dashboards into a website private so only members of the organization can access it.
However, it has a limitation. When accessing the embedded dashboard, the users need to sign in with their Power BI premium account or they can be a free user but the dashboard needs to be in a Power BI premium workspace 👑
The steps to securely embed a dashboard to a website are fairly similar to the ones above.
To do that,
In reading view:
Step 1) Click the File icon.
Step 2) Then, hover your mouse over ‘Embed’ and select ‘Website or portal’.

In edit mode:
Step 1) Click ‘File’ from the menu above the canvas.
Step 2) Then, click ‘Embed’.

Note that Power BI didn’t throw the warning this time – that’s because we are embedding in a private environment this time.
Power BI will now display the Secure embed code prompt.

Now, if any user wants to see the dashboard, Power BI will first require them to sign in.

How cool is that? 😎
Managing embed codes
So… embedding a dashboard in a website is easy, right?
What if you need to embed the same dashboard on another website? Repeat the whole process? You could do it if you like but why go through the trouble 🤨
Power BI stores all embedded codes created in your workspace. You can manage them – reuse or delete them – straight from Power BI.
To do that,
Step 1) Select the gear icon on the top left corner of the dashboard screen.
Step 2) Select Manage Embedded Codes from the options.

On the screen that appears,
Step 1) Select the ellipsis icon (…) next to the name of your report.
Step 2) It will show a dropdown.

Get code will copy the code so you can reuse it again.
Deleting a code will disable any link to that visual or report.
Step 1) Selecting Delete will show a prompt.
Step 2) Press Delete to confirm ❌

And it’s done!
Isn’t this fun? Try it now! 🤠
Limitations
Embedding a dashboard to a website is very easy and gives you control over how the dashboard will look on the website, but it has its fair share of limitations. Let’s see these below 🔽
- Embedding dashboard privately option works only for dashboards created in Power BI Service.
- You need to sign in to view the report again if you open a new window or tab.
- Dashboards using Live Connection data sources are not supported with Publish to the web.
- For the embed code to work, access to the dashboard needs to be maintained by the user who created it. This requires the user to have a Power BI Premium or Pro license.
- If you are using a work or school account, you need to get permission from the admin to use the embedding feature.
Conclusion
In this guide, we saw how to embed the Power BI dashboard in the website. We saw how to embed dashboards publicly and privately and turn complex information into actionable insights 📊
Embedding your dashboard in a website is an easy way to share data insights with your audience, and enable real-time analytics directly within your webpage.
It offers a flexible solution for various use cases. By making data accessible in this way, not only do you enhance transparency but also empower viewers to engage with the information.
To learn more about Power BI and dashboards, give the following articles a read:
How to Make a Dashboard in Excel: Step-by-Step Guide (2024)
The Differences Between Reports & Dashboards in Power BI
Excel Dashboard Training Guide for 2024: Top 7 Places to Learn
We hope you enjoyed reading this article as much as we did crafting it! 🤗

Written by Kasper Langmann
Hi, I'm Kasper Langmann👋
I'm the co-founder of Spreadsheeto, a certified Microsoft Office Specialist, and a Microsoft MVP.
With over 10 years of experience, I’ve taught Excel and Power BI to millions of people worldwide.
I spent over 17 hours researching and writing this tutorial.
Last updated on October 31st, 2024.
Before you go, sign up for my free Power BI course (+100,000 students) ->